Toyota 4Runner: Disassembly
DISASSEMBLY
PROCEDURE
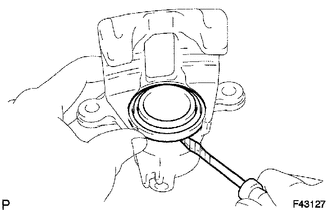
1. REMOVE CYLINDER BOOT
|
(a) Using a screwdriver, remove the cylinder boot from the rear disc brake cylinder. HINT: Tape the screwdriver tip before use. |
|
2. REMOVE REAR DISC BRAKE PISTON
|
(a) Place a cloth or equivalent between the rear disc brake piston and rear disc brake cylinder. |
|
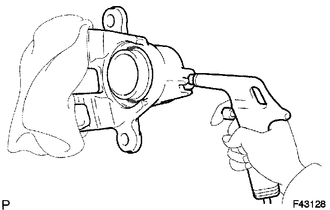
(b) Use compressed air to remove the rear disc brake piston from the rear disc brake cylinder.
CAUTION:
Do not place your fingers in front of the piston when using compressed air.
NOTICE:
Do not spatter the brake fluid.
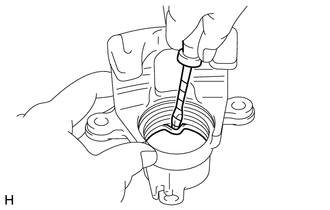
3. REMOVE PISTON SEAL
|
(a) Using a screwdriver, remove the piston seal from the rear disc brake cylinder. HINT: Tape the screwdriver tip before use. NOTICE: Do not damage the inner cylinder or cylinder groove. |
|
4. REMOVE REAR DISC BRAKE BLEEDER PLUG
(a) Remove the rear disc brake bleeder plug cap and rear disc brake bleeder plug from the rear disc brake cylinder.
 Components
COMPONENTS
ILLUSTRATION
...
 Removal
REMOVAL
CAUTION / NOTICE / HINT
HINT:
Use the same procedure for the RH and LH sides.
The procedure listed below is for the LH side.
PROCEDURE
1. REMOVE REAR WHEEL
2. DRAIN BRA ...
Other materials about Toyota 4Runner:
Dtc Check / Clear
DTC CHECK / CLEAR
1. CHECK FOR DTC
(a) Connect the Techstream to the DLC3.
(b) Turn the ignition switch to ON.
(c) Turn the Techstream on.
(d) Enter the following menus: Body Electrical / Air Conditioner / Trouble Codes.
(e) Check for DTCs.
2. CLEAR DTC ...
Data List / Active Test
DATA LIST / ACTIVE TEST
NOTICE:
In the table below, the values listed under "Normal Condition" are reference
values. Do not depend solely on these reference values when deciding whether a part
is faulty or not.
HINT:
Using the Techstream to r ...
0.0258