Toyota 4Runner: Inspection
INSPECTION
PROCEDURE
1. INSPECT WINDSHIELD WIPER SWITCH ASSEMBLY
|
(a) Measure the resistance according to the value(s) in the table below. Standard Resistance: Front Wiper Switch
Front Washer Switch
Rear Wiper Switch
Rear Washer Switch
If the result is not as specified, replace the windshield wiper switch assembly. Text in Illustration
|
|
(b) Check the intermittent operation.
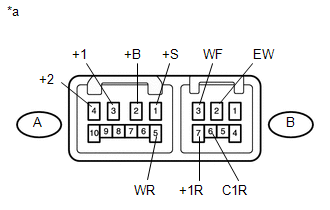
- Connect the positive (+) lead of a voltmeter to terminal A-3 (+1) and the negative (-) lead to terminal B-2 (EW).
- Connect the positive (+) lead of the battery to terminal A-2 (+B) and the negative (-) lead to terminal B-2 (EW) and A-1 (+S).
- Turn the wiper switch to the INT position.
- Connect the positive (+) lead of the battery to terminal A-1 (+S) for 5 seconds.
- Connect the negative (-) lead of the battery to terminal A-1 (+S). Operate
the intermittent wiper relay and check the voltage between terminals A-3
(+1) and B-2 (EW).
OK:
Voltage changes as shown in the illustration.
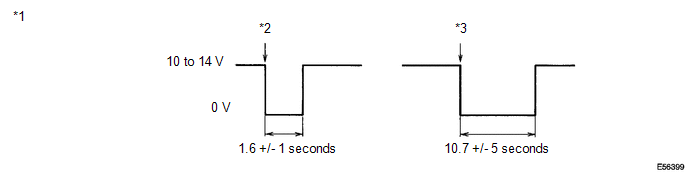
If the result is not as specified, replace the windshield wiper switch assembly.
Text in Illustration*1
Voltage between terminals A-3 (+1) and B-2 (EW)
*2
FAST: Negative lead of battery connected to terminal A-1 (+S)
*3
SLOW: Negative lead of battery connected to terminal A-1 (+S)
-
-
 Removal
REMOVAL
PROCEDURE
1. DISCONNECT CABLE FROM NEGATIVE BATTERY TERMINAL
NOTICE:
When disconnecting the cable, some systems need to be initialized after the cable
is reconnected (See page ).
2. RE ...
 Installation
INSTALLATION
PROCEDURE
1. INSTALL WINDSHIELD WIPER SWITCH ASSEMBLY
(a) Attach the claw to install the windshield wiper switch assembly.
(b) Connect the 2 connectors.
2. INSTALL UPPER STEERING COL ...
Other materials about Toyota 4Runner:
Diagnosis System
DIAGNOSIS SYSTEM
DESCRIPTION
(a) Diagnostic Trouble Codes (DTCs) can be read from the Data Link Connector
3 (DLC3) of the vehicle. When the rear view monitor system seems to be malfunctioning,
use the Techstream to check for malfunctions and to perform r ...
Removal
REMOVAL
CAUTION / NOTICE / HINT
HINT:
Use the same procedure for the RH and LH sides.
The procedure listed below is for the LH side.
When removing the window frame moulding, heat the vehicle body and window
frame moulding using a heat li ...
0.0095