Toyota 4Runner: Inspection
INSPECTION
PROCEDURE
1. INSPECT DOOR CONTROL TRANSMITTER MODULE
(a) Inspect the operation of the transmitter.
(1) Remove the battery (lithium battery) from the transmitter (See page
.gif) ).
).
|
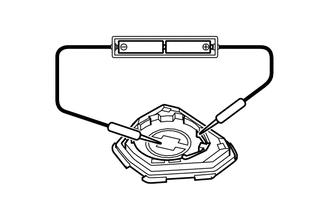
(2) Install a new or normal battery (lithium battery). HINT: When a new or normal battery is not available, first connect 2 new 1.5 V batteries in series. Then connect leads to the batteries and apply 3 V to the transmitter as shown in the illustration. |
|
(3) From outside the vehicle, approximately 1 m (3.28 ft) from the driver side outside door handle, test the transmitter by pointing its key plate at the vehicle and pressing a transmitter switch.
OK:
The door lock can be operated via the transmitter.
The LED comes on more than once.
- The operational area differs depending on the user, the way the transmitter is held and the location.
- The weak electric waves from the transmitter may be affected if the area has strong electric waves or noise. The transmitter operational area may be reduced or the transmitter may not function.
(b) Inspect the battery capacity.
(1) Remove the battery from an transmitter that does not operate (See page
).
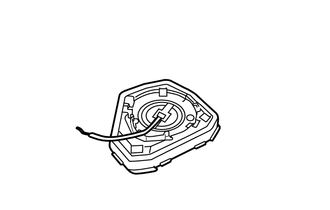
(2) Attach a lead wire (0.6 mm (0.0236 in.) or less in diameter including wire sheath) with tape or equivalent to the negative terminal.
NOTICE:
Do not wrap the lead wire around a terminal, wedge it between the terminals or solder it. A terminal may be deformed or damaged, and the battery will not be able to be installed correctly.
|
(3) Carefully extend the lead wire out from the position shown in the illustration and install the previously removed transmitter battery. |
|
|
(4) Using an oscilloscope, check the transmitter battery voltage waveform. HINT: Measure the transmitter battery voltage while pressing the lock or unlock switch on the transmitter. Standard Voltage:
If the result is not as specified, replace the transmitter battery. |
|

 Removal
REMOVAL
CAUTION / NOTICE / HINT
NOTICE:
Take extra care when handling these precision electronic components.
PROCEDURE
1. REMOVE TRANSMITTER HOUSING COVER
NOTICE:
Take extra care when handling ...
 Installation
INSTALLATION
CAUTION / NOTICE / HINT
NOTICE:
Take extra care when handling these precision electronic components.
PROCEDURE
1. INSTALL TRANSMITTER BATTERY
(a) Install the battery (lit ...
Other materials about Toyota 4Runner:
Lost Communication with Rear Floor Airbag Sensor RH (B1676/85,B1677/85)
DESCRIPTION
HINT:
"Rear floor airbag sensor RH" refers to the rear floor side airbag sensor.
The rear floor side airbag sensor circuit consists of the center airbag
sensor and rear floor side airbag sensor.
The rear floor side airba ...
Installation
INSTALLATION
PROCEDURE
1. INSTALL VOLTAGE INVERTER ASSEMBLY
(a) Install the voltage inverter with the 3 bolts.
Torque:
7.5 N·m {76 kgf·cm, 66 in·lbf}
(b) Connect the 2 connectors.
2. INSTALL DECK TRIM SIDE PANEL ASSEMBLY RH
3. INSTALL FRONT DECK ...
0.0078