Toyota 4Runner: Installation
INSTALLATION
PROCEDURE
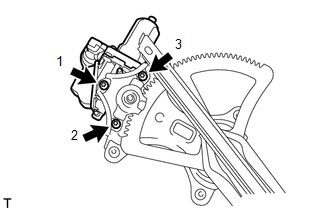
1. INSTALL FRONT POWER WINDOW REGULATOR MOTOR ASSEMBLY LH
NOTICE:
The regulator arm must be below the intermediate position when installing the power window regulator motor.
|
(a) Using a T25 "TORX" socket wrench, install the power window regulator motor with the 3 screws. HINT:
Torque: 5.4 N·m {55 kgf·cm, 48 in·lbf} |
|
2. INSTALL FRONT DOOR WINDOW REGULATOR SUB-ASSEMBLY LH
.gif)
3. INSTALL FRONT DOOR GLASS SUB-ASSEMBLY LH
4. INSTALL FRONT DOOR SERVICE HOLE COVER LH
5. INSTALL FRONT NO. 1 SPEAKER ASSEMBLY
6. INSTALL FRONT DOOR INNER GLASS WEATHERSTRIP LH
7. INSTALL FRONT DOOR TRIM BOARD SUB-ASSEMBLY LH
8. INSTALL NO. 2 DOOR INSIDE HANDLE BEZEL LH
9. INSTALL FRONT DOOR LOWER FRAME BRACKET GARNISH LH
10. CONNECT CABLE TO NEGATIVE BATTERY TERMINAL
NOTICE:
When disconnecting the cable, some systems need to be initialized after the cable
is reconnected (See page ).
11. INITIALIZE POWER WINDOW CONTROL SYSTEM
(a) Initialize the power window control system (See page
).
12. CHECK SRS WARNING LIGHT
(a) Check the SRS warning light (See page ).
 Removal
REMOVAL
PROCEDURE
1. DISCONNECT CABLE FROM NEGATIVE BATTERY TERMINAL
CAUTION:
Wait at least 90 seconds after disconnecting the cable from the negative (-)
battery terminal to disable the SRS sys ...

Other materials about Toyota 4Runner:
VFC Solenoid Circuit (C15F0)
DESCRIPTION
This circuit supplies electric power to the power steering solenoid valve.
The power steering ECU assembly controls the output current to the power steering
solenoid valve in accordance with the steering angle signal, steering zero point
memo ...
Precaution
PRECAUTION
1. IGNITION SWITCH EXPRESSION
(a) The type of ignition switch used on this model differs depending on the specifications
of the vehicle. The expressions listed in the table below are used in this section.
Expression
Igniti ...
0.0082