Toyota 4Runner: Installation
INSTALLATION
CAUTION / NOTICE / HINT
CAUTION:
Wear protective gloves. Sharp areas on the parts may injure your hands.
HINT:
A bolt without a torque specification is shown in the standard bolt chart (See
page .gif) ).
).
PROCEDURE
1. INSTALL REAR SEAT CUSHION LOCK STRIKER
(a) Install the striker with the 2 bolts.
Torque:
13 N·m {127 kgf·cm, 9 ft·lbf}
2. INSTALL REAR NO. 2 SEATBACK LOCK STRIKER SUB-ASSEMBLY RH
(a) Attach the claw and install the striker with the 2 bolts.
(b) Tighten the bolts in the order indicated in the illustration.
Torque:
37 N·m {377 kgf·cm, 27 ft·lbf}
3. INSTALL DECK TRIM SIDE PANEL ASSEMBLY RH
4. INSTALL NO. 1 LUGGAGE COMPARTMENT TRIM COVER
5. INSTALL FRONT DECK SIDE TRIM COVER RH
6. INSTALL NO. 1 LUGGAGE COMPARTMENT TRIM HOOK
7. INSTALL REAR NO. 1 SEAT OUTER LAP BELT ANCHOR COVER
8. INSTALL REAR FLOOR CARPET ASSEMBLY (w/o Deck Board)
9. INSTALL REAR FLOOR MAT REAR SUPPORT PLATE
10. INSTALL INNER FLOOR SIDE RAIL SUB-ASSEMBLY (w/ Deck Board)
11. INSTALL DECK BOARD ASSEMBLY (w/ Deck Board)
12. INSTALL LUGGAGE COMPARTMENT SIDE COVER SUB-ASSEMBLY LH (w/ Deck Board)
13. INSTALL LUGGAGE COMPARTMENT SIDE COVER SUB-ASSEMBLY RH (w/ Deck Board)
14. INSTALL REAR NO. 2 FLOOR BOARD ASSEMBLY (w/ Deck Board)
15. INSTALL NO. 2 DECK BOARD SUB-ASSEMBLY (w/ Deck Board)
16. INSTALL NO. 2 LUGGAGE COMPARTMENT TRIM COVER (w/Deck Board, w/o Rear No. 2 Seat)
17. INSTALL NO. 1 DECK BOARD SUB-ASSEMBLY (w/o Deck Board)
18. INSTALL NO. 1 LUGGAGE COMPARTMENT TRIM COVER (w/o Deck Board)
19. INSTALL REAR DOOR OPENING TRIM WEATHERSTRIP RH
20. INSTALL REAR DOOR SCUFF PLATE RH
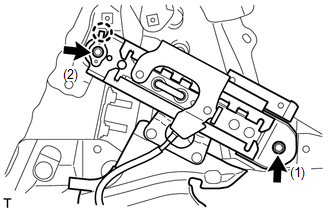
21. INSTALL REAR SEATBACK LOCK CONTROL LEVER BASE RH
(a) Attach the cable clamp to connect the cable.
|
(b) Move the cover in the direction of the arrow to attach the 2 guides. |
|
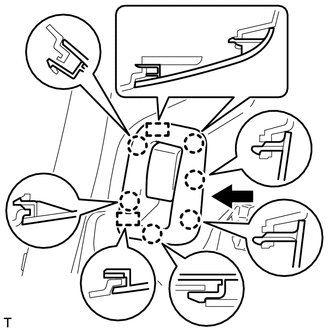
(c) Attach the 6 claws to install the lever base.
22. INSTALL REAR SEATBACK HINGE SUB-ASSEMBLY RH
(a) Install the hinge with the bolt.
Torque:
18 N·m {184 kgf·cm, 13 ft·lbf}
23. INSTALL REAR SEATBACK ASSEMBLY RH
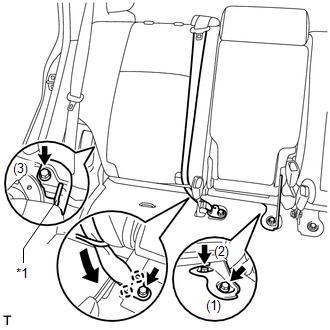
(a) Fold down the seatback, set the seatback positioning wire on the hinge, and then temporarily install the bolt to the hinge.
Text in Illustration|
*1 |
Positioning Wire |
NOTICE:
Be careful not to damage the vehicle body.
(b) Restore the seatback to the upright position and temporarily install the seatback with the 2 bolts.
(c) Tighten the bolts in the order indicated in the illustration.
Torque:
37 N·m {377 kgf·cm, 27 ft·lbf}
(d) Attach the 2 claws and connect the outer belt with the bolt.
Torque:
42 N·m {428 kgf·cm, 31 ft·lbf}
24. INSTALL REAR SEATBACK BOARD CARPET ASSEMBLY RH
(a) for Plastic Seatback Board:
(1) Attach the 4 clips to install the carpet.
(2) Attach the 5 claws and 2 clips to install the carpet.
(b) for Seatback Board with carpet:
Attach the 2 claws and 5 clips to install the carpet.
25. INSTALL REAR SEATBACK COVER
(a) Attach the 4 claws to install the cover.
26. INSTALL REAR SEAT HEADREST ASSEMBLY
(a) Install the headrest.
27. INSTALL REAR SEAT CUSHION ASSEMBLY RH
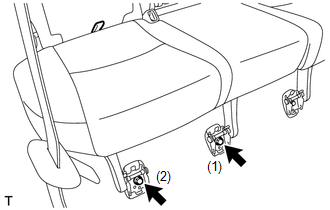
(a) Temporarily install the seat cushion with the 2 bolts.
NOTICE:
Be careful not to damage the vehicle body.
(b) Tighten the bolts in the order indicated in the illustration.
Torque:
37 N·m {377 kgf·cm, 27 ft·lbf}
(c) Lock the seat cushion.
28. INSTALL REAR SEAT CUSHION HINGE COVER RH
(a) Attach the 3 claws to install the cover.
29. INSTALL REAR SEAT CUSHION HINGE COVER
(a) Attach the 3 claws to install the cover.
 Removal
REMOVAL
CAUTION / NOTICE / HINT
CAUTION:
Wear protective gloves. Sharp areas on the parts may injure your hands.
PROCEDURE
1. REMOVE REAR SEAT CUSHION HINGE COVER
(a) Using a moulding remover, ...
 Rear No. 1 Seat Assembly(for 60/40 Split Slide Walk-in Seat Type Lh Side)
Components
COMPONENTS
ILLUSTRATION
ILLUSTRATION
ILLUSTRATION
ILLUSTRATION
ILLUSTRATION
ILLUSTRATION
Removal
REMOVAL
CAUTION / NOTICE / HINT
CAUTION:
Wear protective gloves. ...
Other materials about Toyota 4Runner:
Precaution
PRECAUTION
1. IGNITION SWITCH EXPRESSION
HINT:
The type of ignition switch used on this model differs according to the specifications
of the vehicle. The expressions listed in the table below are used in this section.
Expression
Ign ...
Disassembly
DISASSEMBLY
PROCEDURE
1. REMOVE FRONT NO. 2 AXLE INBOARD JOINT BOOT CLAMP
(a) Hold the drive shaft lightly in a vise between aluminum plates.
(b) Using pliers, remove the front No. 2 axle inboard joint boot clamp
as shown in the illustration ...
0.0077