Toyota 4Runner: Installation with LATCH system (rear/second row seats only)
Installing on the rear seats (vehicles without third row seats)
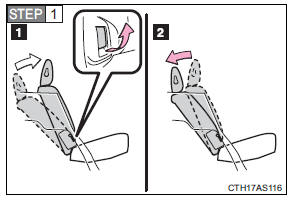
Fold the seatback while pulling the seatback angle adjustment lever. Return the seatback and secure it at the first lock position.
Type A
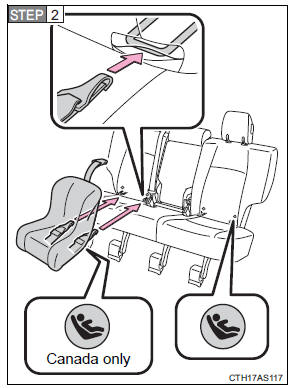
Latch the hooks of the lower straps onto the LATCH anchors.
If the child restraint has a top tether strap, the top tether strap should be latched onto the top tether strap anchor.
For owners in Canada:
The symbol on a child restraint system indicates the presence of a lower connector system.
Type B
Latch the buckles onto the LATCH anchors. If the child restraint has a top tether strap, the top tether strap should be latched onto the top tether strap anchor.
For owners in Canada:
The symbol on a child restraint system indicates the presence of a lower connector system.
Installing on the second row seats (vehicles with third row seats)
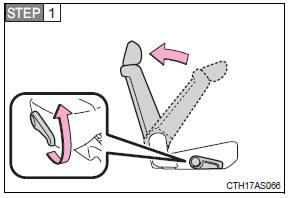
Fold the seatback while pulling the seatback angle adjustment lever. Return the seatback and secure it at the first lock position.
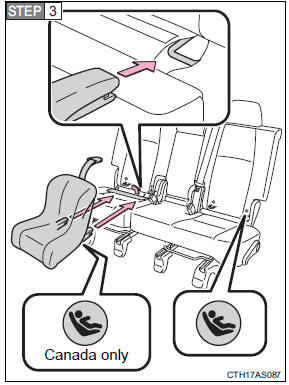
 Flip the cover.
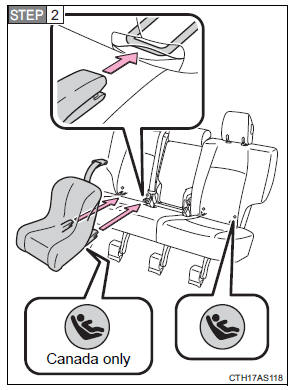
Type A

Latch the hooks of the lower straps onto the LATCH anchors.
If the child restraint has a top tether strap, the top tether strap should be latched onto the top tether strap anchor.
For owners in Canada:
The symbol on a child restraint system indicates the presence of a lower connector system.
Type B
Latch the buckles onto the LATCH anchors. If the child restraint has a top tether strap, the top tether strap should be latched onto the top tether strap anchor.
For owners in Canada:
The symbol on a child restraint system indicates the presence of a lower connector system.
 Installing child restraints
Follow the child restraint system manufacturer’s instructions. Firmly
secure the child restraints using the LATCH anchors or a seat belt.
Attach the top tether strap when installing a child restr ...
 Installing child restraints using a seat belt (child restraint lock function
belt)
Installing child restraints using a seat belt (child restraint lock function
belt)
Rear facing -- Infant seat/convertible seat
Place the child restraint system on the rear seat facing the rear of the
vehicle.
Run the seat belt through the child restraint system and insert th ...
Other materials about Toyota 4Runner:
Inspection
INSPECTION
PROCEDURE
1. INSPECT NAVIGATION ANTENNA ASSEMBLY
(a) Measure the resistance according to the value(s) in the table below.
Standard Resistance:
Tester Connection
Condition
Specif ...
Rear Stabilizer Bar(w/o Kdss)
Components
COMPONENTS
ILLUSTRATION
Inspection
INSPECTION
PROCEDURE
1. INSPECT REAR STABILIZER LINK ASSEMBLY
(a) As shown in the illustration, flip the ball joint stud back and forth
5 times.
...
0.0185