Toyota 4Runner: Mudguard
Components
COMPONENTS
ILLUSTRATION
ILLUSTRATION
Removal
REMOVAL
CAUTION / NOTICE / HINT
HINT:
- Use the same procedure for both the RH and LH sides.
- The procedure listed below is for LH side.
PROCEDURE
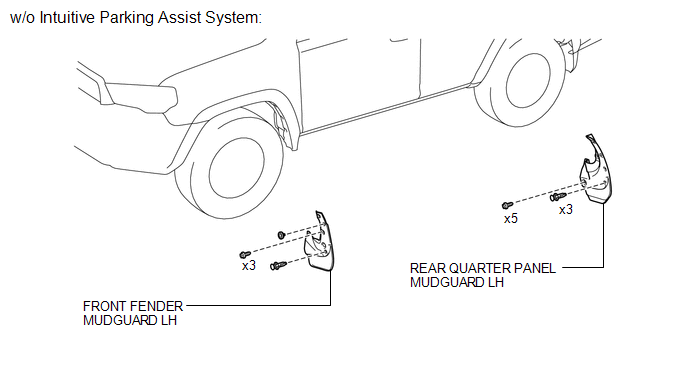
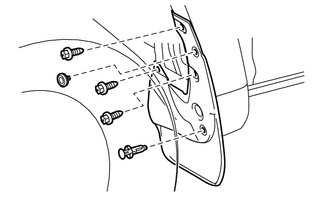
1. REMOVE FRONT FENDER MUDGUARD LH (w/o Intuitive Parking Assist System)
|
(a) Remove the 2clips, 3 screws and front fender mudguard LH. |
|
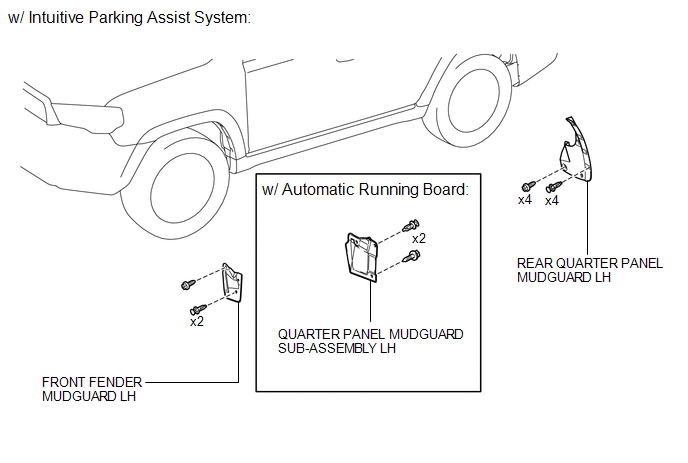
2. REMOVE FRONT FENDER MUDGUARD LH (w/ Intuitive Parking Assist System)
|
(a) Remove the 2 clips, screw and front fender mudguard LH. |
|

3. REMOVE QUARTER PANEL MUDGUARD SUB-ASSEMBLY LH (w/ Automatic Running Board)
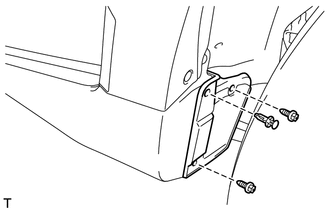
(a) Remove the clip, 2 screws and quarter panel mudguard sub-assembly LH.
4. REMOVE REAR QUARTER PANEL MUDGUARD LH (w/o Intuitive Parking Assist System)
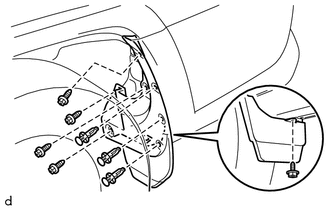
(a) Remove the 3 clips, 5 screws and rear quarter panel mudguard LH.
5. REMOVE REAR QUARTER PANEL MUDGUARD LH (w/ Intuitive Parking Assist System)
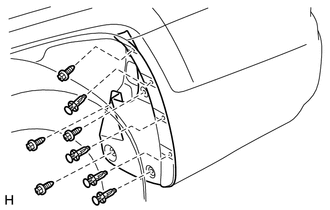
(a) Remove the 4 clips, 4 screws and rear quarter panel mudguard LH.
Installation
INSTALLATION
CAUTION / NOTICE / HINT
HINT:
- Use the same procedure for both the RH and LH sides.
- The procedure listed below is for LH side.
PROCEDURE
1. INSTALL FRONT FENDER MUDGUARD LH (w/o Intuitive Parking Assist System)
(a) Install the front fender mudguard LH with the 3 screws and 2clips.
2. INSTALL FRONT FENDER MUDGUARD LH (w/ Intuitive Parking Assist System)
(a) Install the front fender mudguard LH with the screw and 2 clips.
3. INSTALL QUARTER PANEL MUDGUARD SUB-ASSEMBLY LH (w/ Automatic Running Board)
(a) Install the quarter panel mudguard sub-assembly LH with the 2 screws and clip.
4. INSTALL REAR QUARTER PANEL MUDGUARD LH (w/o Intuitive Parking Assist System)
(a) Install the rear quarter panel mudguard LH with the 5 screws and 3 clips.
5. INSTALL REAR QUARTER PANEL MUDGUARD LH (w/ Intuitive Parking Assist System)
(a) Install the rear quarter panel mudguard LH with the 4 screws and 4 clips.
 Installation
INSTALLATION
CAUTION / NOTICE / HINT
HINT:
Use the same procedure for the RH and LH sides.
The procedure listed below is for the LH side.
When installing the window frame moulding, ...
 Name Plate
...
Other materials about Toyota 4Runner:
Seat Heater Control
Components
COMPONENTS
ILLUSTRATION
Removal
REMOVAL
CAUTION / NOTICE / HINT
CAUTION:
Wear protective gloves. Sharp areas on the parts may injure your hands.
HINT:
Use the same procedure for the RH and LH sides.
The procedure listed be ...
Back Door Entry Lock Function does not Operate
DESCRIPTION
If the back door entry lock function does not operate but the back door unlock
function operates, the communication line between the vehicle and electrical key
transmitter is normal. The entry lock switch circuit (back door control switch → ...
0.0078