Toyota 4Runner: Reassembly
REASSEMBLY
CAUTION / NOTICE / HINT
NOTICE:
When installing the hood bulge protector, heat the hood bulge surface using a heat light.
Standard:
|
Item |
Temperature |
|---|---|
|
Hood Bulge |
20 to 30°C (68 to 86°F) |
NOTICE:
Do not heat the hood bulge excessively.
PROCEDURE
1. INSTALL HOOD SUPPORT ASSEMBLY LH
.gif)
2. INSTALL HOOD SUPPORT ASSEMBLY RH
HINT:
Use the same procedure for the LH side and RH side.
3. CONNECT WASHER HOSE ASSEMBLY
|
(a) Attach the 5 clamps to connect the washer hose assembly. |
|
.png)
4. INSTALL WASHER NOZZLE SUB-ASSEMBLY
5. INSPECT WASHER NOZZLE SUB-ASSEMBLY
6. ADJUST WASHER NOZZLE SUB-ASSEMBLY
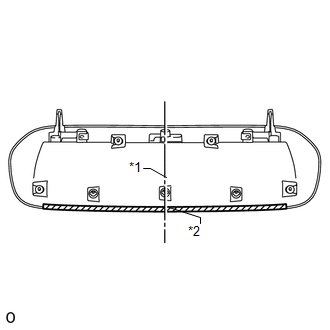
7. INSTALL NO. 3 HOOD BULGE PROTECTOR (w/ Hood Bulge)
(a) When using a new hood bulge:
(1) Clean the hood bulge surface.
(2) Using a heat light, heat the hood bulge surface.
(b) When reusing the hood bulge:
(1) Using a heat light, heat the hood bulge surface.
(2) Remove the double-sided tape from the hood bulge.
(3) Wipe off any tape adhesive residue with cleaner.
|
(c) Install a new No. 3 hood bulge protector as shown in the illustration. Text in Illustration
|
|
8. INSTALL NO. 2 HOOD BULGE PROTECTOR (w/ Hood Bulge)
(a) When using a new hood bulge:
(1) Clean the hood bulge surface.
(2) Using a heat light, heat the hood bulge surface.
(b) When reusing the hood bulge:
(1) Using a heat light, heat the hood bulge surface.
(2) Remove the double-sided tape from the hood bulge.
(3) Wipe off any tape adhesive residue with cleaner.
|
(c) Install 2 new No. 2 hood bulge protectors as shown in the illustration. Text in Illustration
|
|
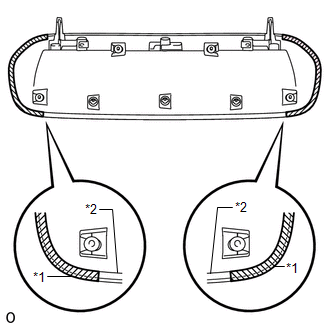
9. INSTALL NO. 1 HOOD BULGE PROTECTOR (w/ Hood Bulge)
(a) When using a new hood bulge:
(1) Clean the hood bulge surface.
(2) Using a heat light, heat the hood bulge surface.
(b) When reusing the hood bulge:
(1) Using a heat light, heat the hood bulge surface.
(2) Remove the double-sided tape from the hood bulge.
(3) Wipe off any tape adhesive residue with cleaner.
|
(c) Install 2 new No. 1 hood bulge protectors as shown in the illustration. Standard:
|
|
10. INSTALL HOOD AIR INTAKE GUIDE (w/ Hood Bulge)
|
(a) Attach the 4 claws to install the hood air intake guide to the hood bulge. |
|
.png)
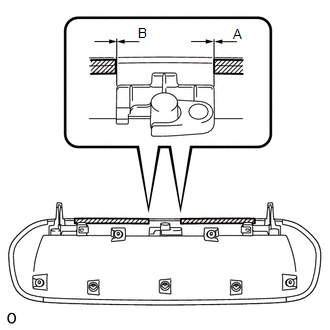
11. INSTALL HOOD BULGE (w/ Hood Bulge)
|
(a) Attach the 2 guides to install the hood bulge together with the hood air intake guide as shown in the illustration. |
|
|
(b) Attach the 3 clips. |
|
.png)
|
(c) Install the 4 nuts. |
|
.png)
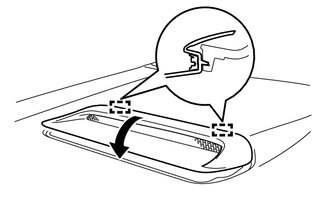
12. INSTALL HOOD INSULATOR
|
(a) Attach the 2 claws. |
|
.png)
(b) Install the hood insulator with the 10 clips.
13. INSTALL HOOD TO RADIATOR SUPPORT SEAL
|
(a) Attach the 7 clips to install the hood to radiator support seal. |
|
.png)
 Adjustment
ADJUSTMENT
CAUTION / NOTICE / HINT
HINT:
Centering bolts are used to mount the hood hinge and hood lock. The
hood and hood lock cannot be adjusted with the centering bolts installed. ...

Other materials about Toyota 4Runner:
Power Source Control ECU Malfunction (B2782)
DESCRIPTION
The steering lock ECU activates the steering lock motor with the power from the
power management control ECU through the IGE circuit. This prevents the steering
from being locked while the vehicle is moving.
If NG (PAST) is displayed for Powe ...
Removal
REMOVAL
CAUTION / NOTICE / HINT
CAUTION:
Wear protective gloves. Sharp areas on the parts may injure your hands.
HINT:
Use the same procedure for the power seat RH and power seat LH sides.
The procedure listed below is for the power seat LH ...
0.0066