Toyota 4Runner: Hood Support
Components
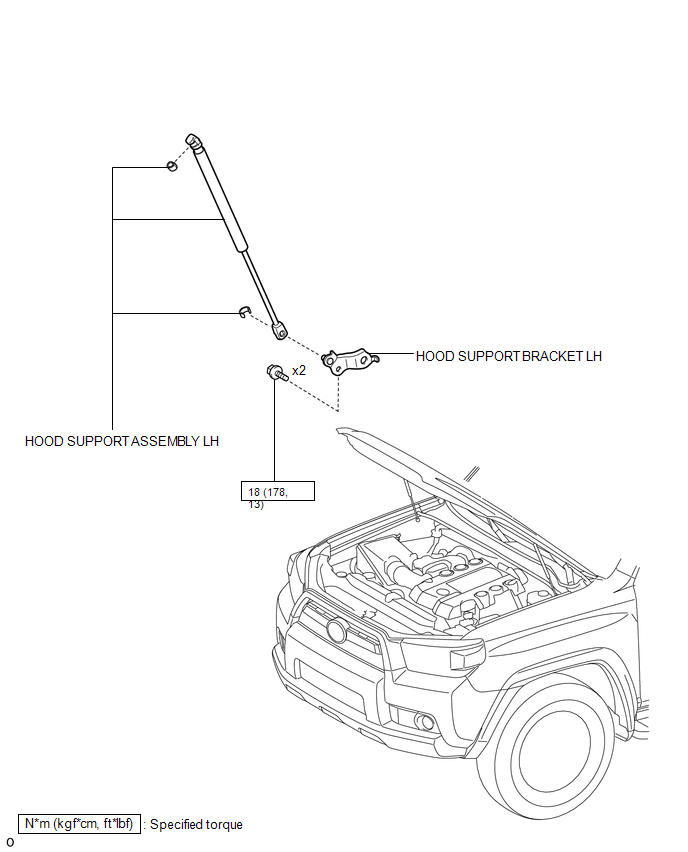
COMPONENTS
ILLUSTRATION
Removal
REMOVAL
CAUTION / NOTICE / HINT
HINT:
- Use the same procedure for the RH and LH sides.
- The procedure listed below is for the LH side.
PROCEDURE
1. REMOVE HOOD SUPPORT ASSEMBLY LH
NOTICE:
- Avoid touching the piston rod as much as possible to prevent foreign matter from attaching to it. Be sure to hold the cylinder while servicing the vehicle.
- Do not wear cotton gloves or other similar materials when handling the piston rod. Fibers may attach to the rod and result in gas leaks.
- In order to prevent the piston rod from deforming, do not apply any horizontal load to the door stay.
|
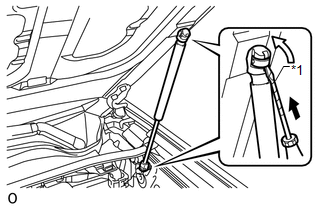
(a) Using a screwdriver, remove the 2 stop rings as shown in the illustration, and then remove the hood support. Text in Illustration
NOTICE: Remove the hood support assembly while supporting the hood panel with one hand. HINT: Tape the screwdriver tip before use. |
|
2. REMOVE HOOD SUPPORT BRACKET LH
|
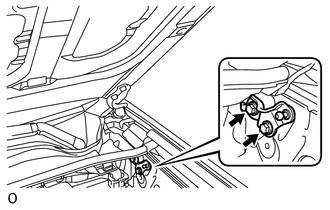
(a) Remove the 2 bolts and hood support bracket. |
|
Installation
INSTALLATION
CAUTION / NOTICE / HINT
HINT:
- Use the same procedure for the RH and LH sides.
- The procedure listed below is for the LH side.
PROCEDURE
1. INSTALL HOOD SUPPORT BRACKET LH
|
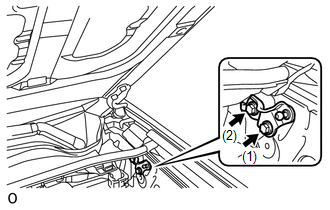
(a) Install the hood support bracket with the 2 bolts in the order shown in the illustration. Torque: 18 N·m {178 kgf·cm, 13 ft·lbf} |
|
2. INSTALL HOOD SUPPORT ASSEMBLY LH
NOTICE:
- Avoid touching the piston rod as much as possible to prevent foreign matter from attaching to it. Be sure to hold the cylinder while servicing the vehicle.
- Do not wear cotton gloves or other similar materials when handling the piston rod. Fibers may attach to the rod and result in gas leaks.
- In order to prevent the piston rod from deforming, do not apply any horizontal load to the door stay.
|
(a) Install a new hood support assembly. NOTICE: Install a new hood support assembly while supporting the hood by hand. |
|

(b) Check that the hood support assembly is attached to the ball joint and it cannot be pulled out.
Disposal
DISPOSAL
PROCEDURE
1. DISPOSE OF HOOD SUPPORT ASSEMBLY
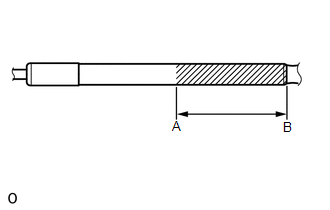
(a) Horizontally hold the hood support in a vise with the piston rod pulled out.
|
(b) Wear safety glasses. Gradually cut any area between A and B shown in the illustration using a metal saw to release the gas. Standard:
CAUTION: Although the gas inside the hood support is colorless, odorless and harmless, there is a possibility that metal debris could scatter. Therefore, cover it with a piece of cloth or other material. |
|
 Installation
INSTALLATION
PROCEDURE
1. INSTALL HOOD LOCK CONTROL CABLE ASSEMBLY
(a) Tie the string that was passed through the engine compartment to
the end of the hood lock control cable assembl ...
 Rear Door
...
Other materials about Toyota 4Runner:
Transmission Fluid Temperature Sensor "B" Circuit Low Input (P2742,P2743)
DESCRIPTION
The Automatic Transmission Fluid (ATF) temperature sensor is on the transmission,
just in front of the oil cooler inlet pipeline.
If the ECM detects an abnormally high ATF temperature near this sensor, it illuminates
the warning light.
HI ...
Rocker Panel Moulding
Components
COMPONENTS
ILLUSTRATION
Removal
REMOVAL
CAUTION / NOTICE / HINT
HINT:
Use the same procedure for both the RH and LH sides.
The procedure listed below is for the LH side.
PROCEDURE
1. REMOVE SIDE STEP ASSEMBLY LH (w/ ...

0.0231