Toyota 4Runner: Disassembly
DISASSEMBLY
CAUTION / NOTICE / HINT
HINT:
- Use the same procedure for both the RH and LH sides.
- The procedure listed below is for the LH side.
PROCEDURE
1. REMOVE NO. 1 HEADLIGHT BULB
|
(a) Turn the No. 1 headlight bulb in the direction indicated by the arrow and pull to remove it. |
|

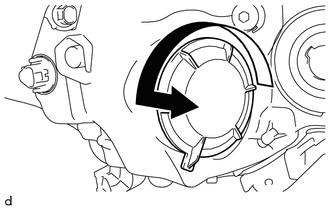
2. REMOVE HEADLIGHT SOCKET COVER
|
(a) Turn the headlight socket cover in the direction indicated by the arrow and pull to remove it. |
|
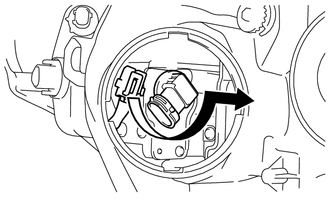
3. REMOVE NO. 2 HEADLIGHT BULB
(a) Disconnect the connector.
|
(b) Turn the No. 2 headlight bulb in the direction indicated by the arrow and pull to remove it. |
|
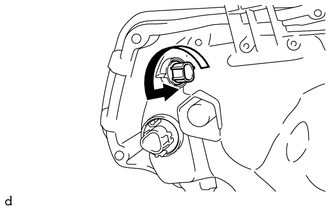
4. REMOVE FRONT SIDE MARKER LIGHT SOCKET
|
(a) Turn the socket in the direction indicated by the arrow and pull to remove the front side marker light socket with the front side marker light bulb. |
|
5. REMOVE FRONT SIDE MARKER LIGHT BULB
(a) Remove the front side marker light bulb from the front side marker light socket.
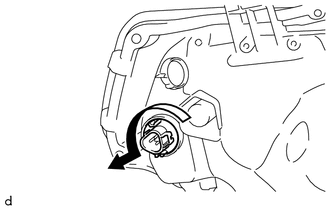
6. REMOVE FRONT TURN SIGNAL LIGHT SOCKET
|
(a) Turn the socket in the direction indicated by the arrow and pull to remove the front turn signal light socket with the front turn signal light bulb. |
|
7. REMOVE FRONT TURN SIGNAL LIGHT BULB
(a) Remove the front turn signal light bulb from the front turn signal light socket.
 Components
COMPONENTS
ILLUSTRATION
ILLUSTRATION
...
 Removal
REMOVAL
CAUTION / NOTICE / HINT
HINT:
Use the same procedure for both the RH and LH sides.
The procedure listed below is for the LH side.
PROCEDURE
1. REMOVE UPPER RADIATOR SUPP ...
Other materials about Toyota 4Runner:
Abbreviations Used In Manual
ABBREVIATIONS USED IN MANUAL
Abbreviation
Meaning
ABS
Anti-Lock Brake System
A/C
Air Conditioner
AC
Alternating Current
ACC
A ...
Open in CAN Main Wire
DESCRIPTION
There may be an open circuit in the CAN main wire and/or DLC3 branch wire when
the resistance between terminals 6 (CANH) and 14 (CANL) of the DLC3 is 69 Ω or higher.
Symptom
Trouble Area
The resistance be ...

0.0259