Toyota 4Runner: Disposal
DISPOSAL
PROCEDURE
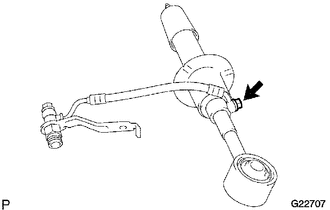
1. DISPOSE OF FRONT SHOCK ABSORBER ASSEMBLY LH (w/ REAS)
HINT:
Use the same procedure for the other front shock absorber.
|
(a) Before disposal, loosen the nut slowly to bleed out the oil and to lower the pressure inside the absorber. NOTICE: Never loosen the nut of the eye union except at the time of disposal. |
|
2. DISPOSE OF FRONT SHOCK ABSORBER ASSEMBLY LH (w/o REAS)
HINT:
Use the same procedure for the other front shock absorber.
|
(a) Fully extend the shock absorber piston rod and fix the shock absorber in place at an angle in a vise or similar tool. |
|
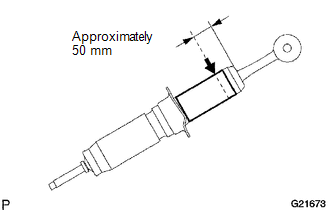
(b) Using a drill or similar tool, slowly make a hole approximately 50 mm (1.97 in.) from the top end of the shock absorber and discharge the gas inside of it.
CAUTION:
- The gas is colorless, odorless and harmless.
- Since the discharged gas may cause chips to fly off, cover the drill with a cloth when making a hole.
 Installation
INSTALLATION
CAUTION / NOTICE / HINT
NOTICE:
Be sure to read the precaution before performing this procedure (See page
).
HINT:
Use the same procedure for the RH and LH sides.
The p ...

Other materials about Toyota 4Runner:
Inspection
INSPECTION
PROCEDURE
1. INSPECT REAR AXLE SHAFT
(a) Using a dial indicator, measure the rear axle shaft runout and flange runout.
Maximum runout:
Shaft runout: 1.50 mm (0.0591 in.)
Flange runout: 0.05 mm (0.00197 in.)
If the rear axle shaft or flange ...
Removal
REMOVAL
PROCEDURE
1. DISCONNECT CABLE FROM NEGATIVE BATTERY TERMINAL
CAUTION:
Wait at least 90 seconds after disconnecting the cable from the negative (-)
battery terminal to disable the SRS system.
NOTICE:
When disconnecting the cable, some systems ne ...

0.0262