Toyota 4Runner: Installation
INSTALLATION
PROCEDURE
1. INSTALL HEADLIGHT DIMMER SWITCH ASSEMBLY
|
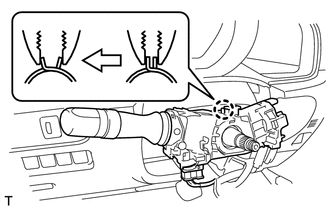
(a) Install the headlight dimmer switch to the steering column, making sure that the stopper protrusions and cutout parts align. |
|

|
(b) While loosening the band clamp, attach the claw to install the headlight dimmer switch. |
|
(c) Connect the connector.
2. INSTALL WINDSHIELD WIPER SWITCH ASSEMBLY
.gif)
3. INSTALL SPIRAL CABLE SUB-ASSEMBLY
(a) Install the spiral cable sub-assembly (See page
).
 Inspection
INSPECTION
PROCEDURE
1. INSPECT HEADLIGHT DIMMER SWITCH ASSEMBLY
(a) Inspect the light control switch.
(1) Measure the resistance according to the value(s) in the table below.
Stan ...
 High Mounted Stop Light Assembly
Components
COMPONENTS
ILLUSTRATION
Removal
REMOVAL
PROCEDURE
1. REMOVE CENTER STOP LIGHT ASSEMBLY
(a) Remove the 2 screws and stop light.
...
Other materials about Toyota 4Runner:
Power Seat Position is not Memorized
DESCRIPTION
When the seat memory SET switch and a memory switch (M1 or M2) are pressed simultaneously,
the main body ECU commands the position control ECU through CAN communication to
record the value of each position sensor.
WIRING DIAGRAM
CAUTION / ...
If the engine will not start
If the engine will not start even though correct starting procedures are
being followed (, 173), consider each of the following points:
The engine will not start even though the starter motor operates normally.
One of the following may be the cause of the ...

0.0255