Toyota 4Runner: Operation Check
OPERATION CHECK
1. CHECK FRONT POWER SEAT FUNCTION
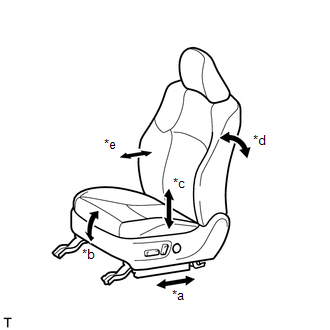
(a) Check the basic functions.
 Text in Illustration
|
*a |
Sliding Function |
|
*b |
Front Vertical Function |
|
*c |
Lifter Function |
|
*d |
Reclining Function |
|
*e |
Lumbar Support Function |
(1) Operate the power seat switches and check to make sure each seat function operates properly:
- Sliding
- Front vertical
- Lifter
- Reclining
- Lumbar support
2. CHECK POWER SEAT MOTOR ASSEMBLY (SLIDING, FRONT VERTICAL, LIFTER, RECLINING)
(a) Check the PTC thermistor operation inside the power seat motor.
HINT:
The PTC thermistor resistance increases when the power seat switch is held down even after the power seat has been moved to as much as possible in one direction. If the resistance increases beyond a specified level, current is cut to prevent a short circuit.
NOTICE:
- Make sure the inspection is performed with the seat installed in the vehicle.
- Perform the 4 steps below for each power seat function.
(1) Choose a power seat function. Operate the power seat switch and move the seat as much as possible in one direction. Keep the seat in that position for approximately 60 seconds.
(2) Operate the power seat switch again and continue to try to move the seat in the same direction as in the previous step. Measure the amount of time elapsed before current is automatically cut (the sound of the motor stops).
Standard:
4 to 90 seconds
(3) After current has been cut, release the power seat switch and wait for approximately 60 seconds.
(4) Operate the same power seat switch and move the seat in the opposite direction. Check that the motor operates.
3. CHECK LUMBAR SUPPORT MOTOR
(a) Check the PTC thermistor operation inside the lumbar support motor.
NOTICE:
Make sure the inspection is performed with the seat installed in the vehicle.
(1) Operate the power seat switch assembly and move the lumbar support to either the foremost or rearmost position. Keep the lumbar support in that position for approximately 60 seconds.
(2) Operate the power seat switch assembly again and continue to try to move the lumbar support in the same direction as in the previous step. Measure the time until current is cut (adjuster operation sound stops).
Standard:
4 to 90 seconds
(3) After current is cut, release the power seat switch assembly and wait for approximately 60 seconds.
(4) Operate the power seat switch assembly and move the lumbar support in the opposite direction. Check that the motor operates.
4. CHECK MEMORY AND SEAT RESTORING OPERATION
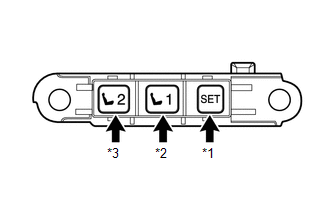
(a) Check the memory and restore operation.
 Text in Illustration
|
*1 |
SET switch |
|
*2 |
M1 switch |
|
*3 |
M2 switch |
HINT:
If the M1 switch and M2 switch are simultaneously pressed while the SET switch is pressed and held, the seat position will not be stored.
(1) Turn the engine switch on (IG) and move the shift lever to P.
(2) Move the seat to the foremost and uppermost position via the seat switch.
(3) Check that the buzzer sounds for 0.5 seconds and the seat position is memorized when the M1 switch of the memory switch and the SET switch are pressed and held, or the SET switch is pressed and then the M1 switch is pressed within 3 seconds.
(4) Move the seat out of the foremost and uppermost position via the seat switch.
(5) Check that the buzzer sounds for 0.5 seconds and the seat position is memorized when the M2 switch of the memory switch and the SET switch are pressed and held, or the SET switch is pressed and then the M2 switch is pressed within 3 seconds.
(6) Check that the buzzer sounds for 0.1 seconds and the seat automatically moves into the foremost and uppermost position (memorized position) when the M1 switch of the memory switch is pressed.
(7) Check that the buzzer sounds for 0.1 seconds and the seat automatically moves out of the foremost and uppermost position (memorized position) when the M2 switch of the memory switch is pressed.
(b) Clear the memory.
(1) Turn the engine switch on (IG).
(2) Press the front power seat switch (front vertical switch) downward 3 times.
HINT:
Perform each switch operation within 10 seconds of the previous operation.
(3) Within 10 seconds of the above operation, begin the following operation: perform the rearward reclining operation and upward lifter operation simultaneously for 10 seconds or more (a buzzer sounds for 0.5 seconds). This clears the memory.
 How To Proceed With Troubleshooting
CAUTION / NOTICE / HINT
HINT:
Use the following procedure to troubleshoot the front power seat control
system.
*: Use the Techstream.
PROCEDURE
1.
VEHI ...
 Problem Symptoms Table
PROBLEM SYMPTOMS TABLE
HINT:
Use the table below to help determine the cause of problem symptoms.
If multiple suspected areas are listed, the potential causes of the symptoms
are lis ...
Other materials about Toyota 4Runner:
Adjustment
ADJUSTMENT
PROCEDURE
1. INSPECT PARKING BRAKE PEDAL TRAVEL
(a) Fully depress the parking brake pedal to engage the parking brake.
(b) Depress the pedal again to disengage the parking brake.
(c) Slowly depress the parking brake pedal using the specified fo ...
Meter Illumination does not Dim at Night
DESCRIPTION
If the dimmer switch is turned to TAIL, HEAD or AUTO, the main body ECU sends
a TAIL relay signal, panel light illumination signal, panel relay signal and TAIL
cancel OFF signal to the combination meter. Then the meter and accessory meter beco ...

0.0206