Toyota 4Runner: Relay
On-vehicle Inspection
ON-VEHICLE INSPECTION
PROCEDURE
1. REMOVE HEADLIGHT RELAY
|
(a) Remove the headlight relay from the engine room relay box. |
|
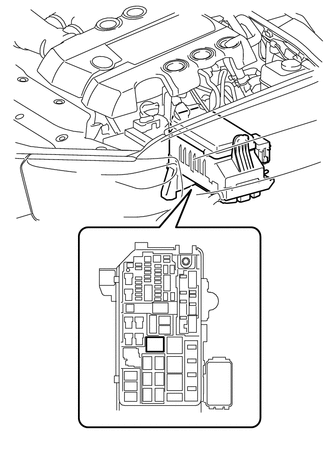
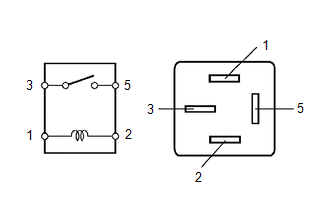
2. INSPECT HEADLIGHT RELAY
|
(a) Measure the resistance according to the value(s) in the table below. Standard Resistance:
If the result is not as specified, replace the headlight relay. |
|
3. INSTALL HEADLIGHT RELAY
(a) Install the headlight relay to the engine room relay box.
 Rear Combination Light Assembly
Components
COMPONENTS
ILLUSTRATION
Removal
REMOVAL
CAUTION / NOTICE / HINT
HINT:
Use the same procedure for both the RH and LH sides.
The procedure listed below is for the LH ...
 Side Turn Signal Light Assembly
Components
COMPONENTS
ILLUSTRATION
Removal
REMOVAL
CAUTION / NOTICE / HINT
HINT:
Use the same procedure for both the RH and LH sides.
The procedure listed below is for the LH ...
Other materials about Toyota 4Runner:
Parking brake
To set the parking brake, fully depress the parking brake pedal with your
left foot while depressing the brake pedal with your right foot.
(Depressing the pedal again releases the parking brake.)
Usage in winter time
See “Winter driving tips” for pa ...
Inspection
INSPECTION
PROCEDURE
1. INSPECT PROPELLER SHAFT ASSEMBLY
(a) Using a dial indicator, check the propeller shaft runout.
Maximum runout:
0.4 mm (0.0157 in.)
If the shaft runout is more than the maximum, replace the shaft.
...

0.0065