Toyota 4Runner: Relay
On-vehicle Inspection
ON-VEHICLE INSPECTION
PROCEDURE
1. CHECK STOP LIGHT CONTROL RELAY
(a) Remove the stop light control relay from the engine room relay block.
|
(b) Measure the resistance according to the value(s) in the table below. Standard Resistance:
If the result is not as specified, replace the relay. |
|
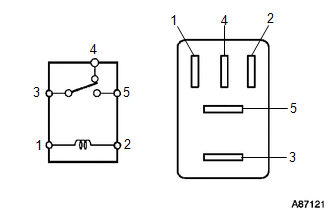
(c) Install the stop light control relay.
 Rear Speed Sensor
Components
COMPONENTS
ILLUSTRATION
Removal
REMOVAL
PROCEDURE
1. REMOVE REAR WHEEL
2. REMOVE REAR SPEED SENSOR LH
(a) Disconnect the speed sensor connector.
...
 Steering Angle Sensor
Components
COMPONENTS
ILLUSTRATION
Removal
REMOVAL
PROCEDURE
1. PLACE FRONT WHEELS FACING STRAIGHT AHEAD
2. DISCONNECT CABLE FROM NEGATIVE BATTERY TERMINAL
CAUTION:
Wait at least 90 sec ...
Other materials about Toyota 4Runner:
Disassembly
DISASSEMBLY
PROCEDURE
1. REMOVE FRONT NO. 1 LOWER ARM BUSH LH
(a) Using a chisel and hammer, pry the flange of the bush outward.
(b) Using SST and a press, press out the bush.
SST: 09632-36 ...
Dtc Check / Clear
DTC CHECK / CLEAR
1. CHECK FOR DTC
(a) Connect the Techstream to the DLC3.
(b) Turn the ignition switch to ON.
(c) Turn the Techstream on.
(d) Enter the following menus: Body Electrical / Air Conditioner / Trouble Codes.
(e) Check for DTCs.
2. CLEAR DTC ...

0.0091