Toyota 4Runner: Removal
REMOVAL
CAUTION / NOTICE / HINT
HINT:
- Use the same procedure for both the RH and LH sides.
- The procedure listed below is for the LH side.
PROCEDURE
1. REMOVE UPPER RADIATOR SUPPORT SEAL
.gif)
2. REMOVE FRONT FENDER MAIN SEAL LH
3. REMOVE FRONT FENDER MAIN SEAL RH
HINT:
Use the same procedure as for the LH side.
4. REMOVE FRONT BUMPER COVER (w/o Intuitive Parking Assist System)
(See page )
5. REMOVE FRONT BUMPER COVER (w/ Intuitive Parking Assist System)
(See page )
6. REMOVE HEADLIGHT ASSEMBLY LH
|
(a) Remove the 3 screws and bolt. |
|
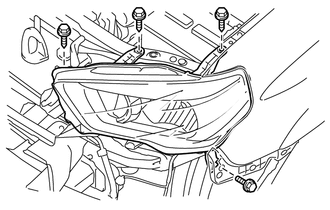
(b) Disconnect the 4 connectors and remove the headlight assembly LH.
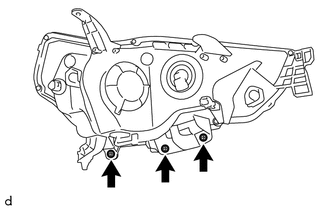
7. REMOVE FRONT BUMPER BAR REINFORCEMENT LH (w/o Intuitive Parking Assist System)
|
(a) Remove the 3 screws and front bumper bar reinforcement LH. |
|
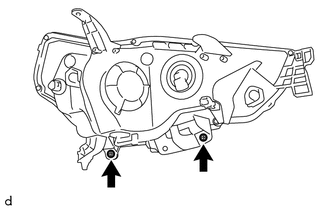
8. REMOVE FRONT BUMPER BAR REINFORCEMENT LH (w/ Intuitive Parking Assist System)
|
(a) Remove the 2 screws and front bumper bar reinforcement LH. |
|
 Disassembly
DISASSEMBLY
CAUTION / NOTICE / HINT
HINT:
Use the same procedure for both the RH and LH sides.
The procedure listed below is for the LH side.
PROCEDURE
1. REMOVE NO. 1 HEADLIGHT ...
 Adjustment
ADJUSTMENT
CAUTION / NOTICE / HINT
HINT:
Use the same procedure for the RH and LH sides.
The procedure listed below is for the LH side.
PROCEDURE
1. VEHICLE PREPARATION FOR HEAD ...
Other materials about Toyota 4Runner:
Dtc Check / Clear
DTC CHECK / CLEAR
1. CHECK DTC
(a) Connect the Techstream to the DLC3.
(b) Turn the ignition switch to ON.
(c) Turn the Techstream on.
(d) Enter the following menus: Body Electrical / Sliding Roof / Trouble Codes.
(e) Check the DTCs.
2. CLEAR DTC
(a) C ...
Customize Parameters
CUSTOMIZE PARAMETERS
1. CUSTOMIZING FUNCTION WITH TECHSTREAM
NOTICE:
When the customer requests a change in a function, first make sure that
the function can be customized.
Be sure to make a note of the current settings before customizing.
...

0.0076