Toyota 4Runner: Removal
REMOVAL
PROCEDURE
1. REMOVE DOOR SCUFF PLATE ASSEMBLY LH
.gif)
2. REMOVE COWL SIDE TRIM BOARD LH
3. REMOVE NO. 2 SWITCH HOLE BASE
4. REMOVE NO. 1 INSTRUMENT CLUSTER FINISH PANEL GARNISH
5. REMOVE LOWER INSTRUMENT PANEL FINISH PANEL SUB-ASSEMBLY
6. REMOVE TURN SIGNAL FLASHER ASSEMBLY
|
(a) Disconnect the connector. |
|
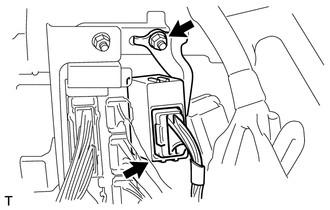
(b) Remove the nut and flasher.
 On-vehicle Inspection
ON-VEHICLE INSPECTION
PROCEDURE
1. CHECK TURN SIGNAL FLASHER ASSEMBLY
(a) Measure the resistance according to the value(s) in the table below.
Standard Resistance:
...
 Installation
INSTALLATION
PROCEDURE
1. INSTALL TURN SIGNAL FLASHER ASSEMBLY
(a) Install the turn signal flasher assembly with the nut.
Torque:
5.5 N·m {56 kgf·cm, 49 in·lbf}
(b) Connect the connector.
2 ...
Other materials about Toyota 4Runner:
Installation
INSTALLATION
PROCEDURE
1. INSTALL GENERATOR ASSEMBLY
(a) Install the generator bracket to the generator with the bolt.
Torque:
20 N·m {204 kgf·cm, 15 ft·lbf}
(b) Install the generator with the 2 bolts.
Torque:
43 N·m {438 kgf·cm, 32 ft·lbf}
(c ...
Initialization
INITIALIZATION
1. INITIALIZE AUTOMATIC RUNNING BOARD SYSTEM
NOTICE:
When a side auto step controller ECU assembly is replaced, the side auto step
controller ECU assembly must be initialized. Functions such as deploying/stowing
and jam protection do not ...

0.0091