Toyota 4Runner: Removal
REMOVAL
PROCEDURE
1. REMOVE REAR AXLE SHAFT LH
(a) Remove the rear axle shaft LH (See page .gif)
).
2. REMOVE REAR AXLE SHAFT RH
HINT:
Use the same procedure described for the LH side.
3. REMOVE PROPELLER SHAFT ASSEMBLY
(a) Remove the propeller shaft assembly (See page
).
4. REMOVE REAR DIFFERENTIAL CARRIER ASSEMBLY
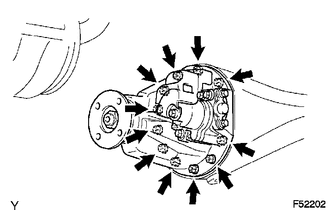
(a) Remove the 11 nuts and 11 washers, differential carrier.
NOTICE:
Be careful not to damage the contact surface.
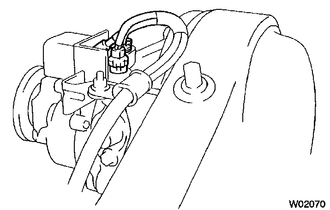
(b) Disconnect the rear differential lock actuator breather hose from the differential actuator assembly.
|
(c) Disconnect the differential lock actuator connector. |
|
5. REMOVE REAR DIFFERENTIAL CARRIER GASKET
 Components
COMPONENTS
ILLUSTRATION
ILLUSTRATION
ILLUSTRATION
...
 Disassembly
DISASSEMBLY
PROCEDURE
1. FIX REAR DIFFERENTIAL CARRIER ASSEMBLY IN PLACE
(a) Fix the rear differential carrier assembly to the overhaul attachment.
2. INSPECT REAR DRIVE PINION COMPANION FLANGE ...
Other materials about Toyota 4Runner:
Problem Symptoms Table
PROBLEM SYMPTOMS TABLE
HINT:
Use the table below to help determine the cause of problem symptoms.
If multiple suspected areas are listed, the potential causes of the symptoms
are listed in order of probability in the "Suspected Area" ...
Gauges and meters
Non-Optitron type meters
Optitron type meters
1. Tachometer Displays the engine speed in revolutions per minute
2. Speedometer Displays the vehicle speed
3. Display change button
4. Engine coolant temperature gauge Displays the engine coolant tempe ...

0.0233