Toyota 4Runner: Security Horn Assembly
Components
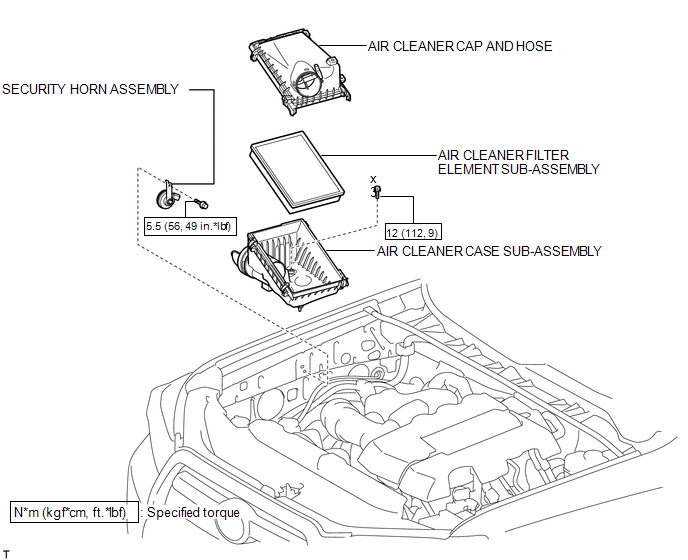
COMPONENTS
ILLUSTRATION
Removal
REMOVAL
PROCEDURE
1. REMOVE AIR CLEANER CAP AND HOSE
.gif)
2. REMOVE AIR CLEANER CASE SUB-ASSEMBLY
3. REMOVE SECURITY HORN ASSEMBLY
|
(a) Disconnect the connector. |
|

(b) Remove the bolt and horn.
Inspection
INSPECTION
PROCEDURE
1. INSPECT SECURITY HORN ASSEMBLY
(a) Apply battery voltage to the horn connector and check the operation of the horn.
OK:
|
Measurement Condition |
Specified Condition |
|---|---|
|
Battery positive (+) → Terminal 1 Battery negative (-) → Horn bracket |
Horn sounds |
If the result is not as specified, replace the security horn assembly.
Installation
INSTALLATION
PROCEDURE
1. INSTALL SECURITY HORN ASSEMBLY
(a) Install the horn with the bolt.
Torque:
5.5 N·m {56 kgf·cm, 49 in·lbf}
(b) Connect the connector.
2. INSTALL AIR CLEANER CASE SUB-ASSEMBLY
.gif)
3. INSTALL AIR CLEANER CAP AND HOSE
 Id Code Box
Components
COMPONENTS
ILLUSTRATION
Installation
INSTALLATION
PROCEDURE
1. INSTALL ID CODE BOX
(a) Attach the 2 claws and move the ID code box in the direction of the
arrow. ...
 Security Indicator Light Assembly
Components
COMPONENTS
ILLUSTRATION
Removal
REMOVAL
PROCEDURE
1. REMOVE NO. 2 INSTRUMENT CLUSTER FINISH PANEL GARNISH
2. REMOVE SECURITY INDICATOR LIGHT ASSEMBLY
(a) Pull th ...
Other materials about Toyota 4Runner:
Switching the display
Press .
Each time is pressed, the
display changes in the following order:
Track title → Track title/Artist name → Track title/Album name → Track
title/Elapsed time
About iPod
• Apple is not responsible for the operation of this device or its ...
Disassembly
DISASSEMBLY
PROCEDURE
1. REMOVE REAR PROPELLER SHAFT UNIVERSAL JOINT SPIDER BEARING
HINT:
Use the same procedure for all rear propeller shaft universal joint spider bearing.
(a) Place matchmarks on the flange yoke and propeller shaft.
Text i ...

0.0075