Toyota 4Runner: Front Airbag Sensor
Components
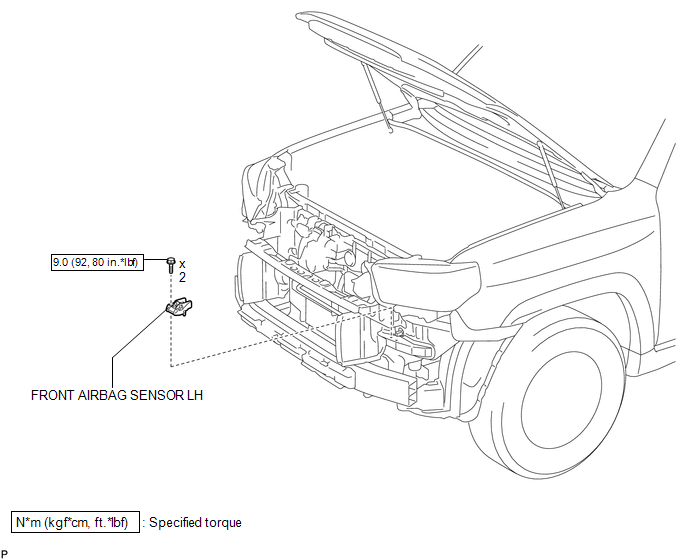
COMPONENTS
ILLUSTRATION
On-vehicle Inspection
ON-VEHICLE INSPECTION
CAUTION / NOTICE / HINT
HINT:
- Use the same procedure for the RH and LH sides.
- The procedure listed below is for the LH side.
PROCEDURE
1. CHECK FRONT AIRBAG SENSOR LH (VEHICLE NOT INVOLVED IN COLLISION)
(a) Perform a diagnostic system check (See page
.gif) ).
).
2. CHECK FRONT AIRBAG SENSOR LH (VEHICLE INVOLVED IN COLLISION AND AIRBAG HAS NOT DEPLOYED)
(a) Perform a diagnostic system check (See page
).
(b) When the front bumper of the vehicle or the surrounding area is damaged, check if there is any damage to the front airbag sensor. If the front airbag sensor has defects as mentioned below, replace it with a new one:
- Cracks, dents or chips on the sensor housing.
- Cracks or other damage to the connector.
- Peeling of the label or damage to the serial number.
CAUTION:
For removal and installation of the front airbag sensor, be sure to follow the correct procedure.
3. CHECK FRONT AIRBAG SENSOR LH (VEHICLE INVOLVED IN COLLISION AND AIRBAG HAS DEPLOYED)
(a) When airbags have deployed as the result of a collision, be certain to replace all front airbag sensors in the damaged area (anywhere in need of repair). Furthermore, it is also necessary to replace any front airbag sensor in undamaged areas that have registered a major collision, or which exhibits any of the following abnormalities:
- Cracks, dents or chips on the sensor housing.
- Cracks or other damage to the connector.
- Peeling of the label or damage to the serial number.
CAUTION:
For removal and installation of the front airbag sensor, be sure to follow the correct procedure.
Removal
REMOVAL
CAUTION / NOTICE / HINT
HINT:
- Use the same procedure for both the RH and LH sides.
- The procedure listed below is for the LH side.
PROCEDURE
1. DISCONNECT CABLE FROM NEGATIVE BATTERY TERMINAL
CAUTION:
Wait at least 90 seconds after disconnecting the cable from the negative (-) battery terminal to disable the SRS system.
NOTICE:
When disconnecting the cable, some systems need to be initialized after the cable
is reconnected (See page .gif) ).
).
2. REMOVE FRONT BUMPER COVER (w/o Intuitive Parking Assist System)
(See page )
3. REMOVE FRONT BUMPER COVER (w/ Intuitive Parking Assist System)
(See page )
4. REMOVE FRONT AIRBAG SENSOR LH
|
(a) Disconnect the connector. |
|
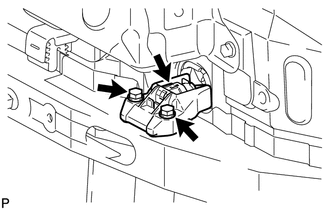
(b) Remove the 2 bolts and front airbag sensor LH.
Installation
INSTALLATION
CAUTION / NOTICE / HINT
HINT:
- Use the same procedure for both the RH and LH sides.
- The procedure listed below is for the LH side.
PROCEDURE
1. INSTALL FRONT AIRBAG SENSOR LH
(a) Install the front airbag sensor LH with the 2 bolts.
Torque:
9.0 N·m {92 kgf·cm, 80 in·lbf}
NOTICE:
- If the front airbag sensor LH has been dropped, or there are any cracks, dents or other defects in the case, bracket or connector, replace it with a new one.
- When installing the front airbag sensor LH, be careful that the SRS wiring does not interfere with other parts and that it is not pinched between other parts.
(b) Connect the connector.
(c) Check that there is no looseness in the installation parts of the front airbag sensor LH.
2. INSTALL FRONT BUMPER COVER (w/o Intuitive Parking Assist System)
(See page .gif) )
)
3. INSTALL FRONT BUMPER COVER (w/ Intuitive Parking Assist System)
(See page )
4. CONNECT CABLE TO NEGATIVE BATTERY TERMINAL
NOTICE:
When disconnecting the cable, some systems need to be initialized after the cable
is reconnected (See page ).
5. CHECK SRS WARNING LIGHT
(See page )
 Disposal
DISPOSAL
CAUTION / NOTICE / HINT
CAUTION:
Before performing pre-disposal deployment of any SRS part, review and closely
follow all applicable environmental and hazardous material regulations. Pre ...

Other materials about Toyota 4Runner:
Problem Symptoms Table
PROBLEM SYMPTOMS TABLE
HINT:
Use the table below to help determine the cause of problem symptoms.
If multiple suspected areas are listed, the potential causes of the symptoms
are listed in order of probability in the "Suspected Area" ...
Inspection
INSPECTION
PROCEDURE
1. INSPECT PARK/NEUTRAL POSITION SWITCH ASSEMBLY
(a) Measure the resistance according to the value(s) in the table below.
Standard Resistance:
Tester Connection
Condition
Specified Condition
...
0.0077