Toyota 4Runner: Installation
INSTALLATION
CAUTION / NOTICE / HINT
CAUTION:
Wear protective gloves. Sharp areas on the parts may injure your hands.
PROCEDURE
1. INSTALL REAR SEAT ASSEMBLY RH
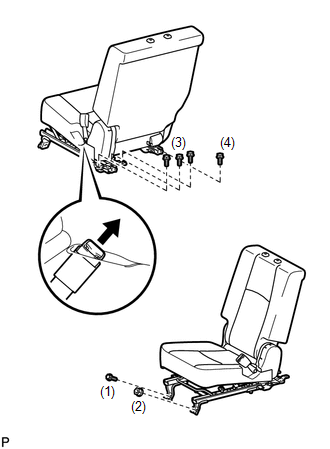
(a) Place the seat in the cabin.
NOTICE:
Be careful not to damage the vehicle body.
HINT:
Be sure to install the seat with the seatback folded down.
(b) Connect the center inner belt to the seat.
(c) Temporarily install the seat with the 5 bolts and nut.
(d) Tighten the bolts and nut in the order indicated in the illustration.
Torque:
37 N·m {377 kgf·cm, 27 ft·lbf}
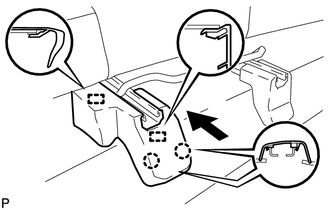
2. INSTALL REAR SEAT TRACK COVER RH
(a) Attach the 5 clips and claw to install the cover.
3. INSTALL SEAT TRACK INNER BRACKET COVER RH
(a) Attach the 8 clips to install the cover.
4. INSTALL REAR SEAT TRACK OUTER BRACKET COVER
(a) Move the cover in the direction of the arrow to attach the 2 guides.
(b) Attach the 2 claws to install the cover.
5. INSTALL REAR SEAT TRACK INNER BRACKET COVER
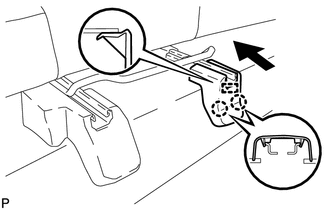
(a) Attach the 2 claws and guide to install the cover.
6. INSTALL REAR SEAT HEADREST ASSEMBLY
(a) Install the headrest.
 Reassembly
REASSEMBLY
CAUTION / NOTICE / HINT
CAUTION:
Wear protective gloves. Sharp areas on the parts may injure your hands.
HINT:
A bolt without a torque specification is shown in the standard bolt chart ...

Other materials about Toyota 4Runner:
Manual Up / Down Function does not Operate on Back Door Only
DESCRIPTION
If the back door power window does not operate, the retract switch in the rear
wiper motor, the back door power window regulator motor or the wire harness may
be abnormal.
WIRING DIAGRAM
PROCEDURE
1.
SYSTEM CHECK
...
Pressure Sensor Malfunction / Upside (C1812/12)
DESCRIPTION
In the KDSS hydraulic circuit, the fluid is contained under pressure. If the
fluid temperature is 20°C (68°F), the pressure is approximately 3.0 MPa (30.6 kgf/cm2,
435 psi).
DTC Code
DTC Detection Condition
...
0.025