Toyota 4Runner: Reassembly
REASSEMBLY
CAUTION / NOTICE / HINT
CAUTION:
Wear protective gloves. Sharp areas on the parts may injure your hands.
HINT:
A bolt without a torque specification is shown in the standard bolt chart (See
page .gif) ).
).
PROCEDURE
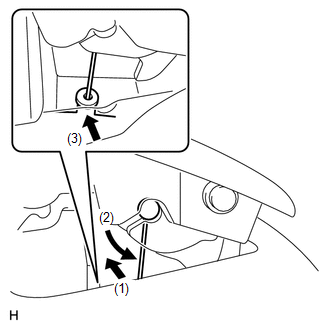
1. INSTALL REAR SEAT TRACK ADJUSTING HANDLE RH
|
(a) Install the handle. HINT: Make sure the handle is straight when installing it, and check that it is centered. |
|

|
(b) Install the seat cushion side frame. |
|
2. INSTALL REAR SEAT CUSHION FRAME SUB-ASSEMBLY RH
(a) Install the seat cushion frame and seat leg plate with the 6 nuts.
Torque:
32 N·m {326 kgf·cm, 24 ft·lbf}
3. INSTALL REAR SEAT CUSHION SPRING
(a) Attach the 2 hooks to install the spring.
4. INSTALL REAR SEAT COVER
(a) Install the cover with the screw.
5. INSTALL REAR SEATBACK FRAME SUB-ASSEMBLY RH
(a) Temporarily install the seatback frame with the 4 "TORX" bolts.
(b) Using a T40 "TORX" socket wrench, tighten the 4 "TORX" bolts.
Torque:
29 N·m {296 kgf·cm, 21 ft·lbf}
6. INSTALL REAR SEATBACK LOCK PLATE RH
(a) Install the lock plate with the nut.
Torque:
18 N·m {184 kgf·cm, 13 ft·lbf}
(b) Attach the 2 cable clamps and connect the cable.
7. INSTALL REAR SEAT CUSHION SET PLATE
(a) Install the set plate with the 2 nuts.
Torque:
18 N·m {184 kgf·cm, 13 ft·lbf}
8. INSTALL REAR NO. 2 SEAT RECLINING CONTROL CABLE
(a) Install the cable.
(b) Attach the cable clamp and connect the cable.
9. INSTALL REAR SEAT RECLINING CONTROL CABLE
(a) Install the cable.
(b) Attach the 2 cable clamps and connect the cable.
(c) Install 3 new cable ties.
10. INSTALL REAR SEAT BACK SPRING DAMPER
(a) Install the rear seat back spring damper with the 2 nuts.
Torque:
19 N·m {194 kgf·cm, 14 ft·lbf}
11. INSTALL REAR SEAT BACK SPRING DAMPER
(a) Install the rear seat back spring damper with the 2 nuts.
Torque:
19 N·m {194 kgf·cm, 14 ft·lbf}
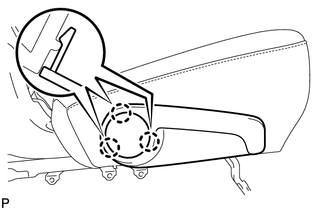
12. INSTALL RECLINING ADJUSTER INSIDE COVER RH
(a) Attach the claw and guide to install the cover.
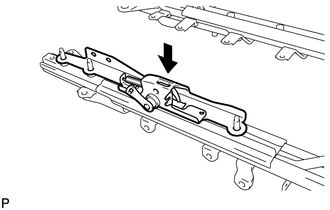
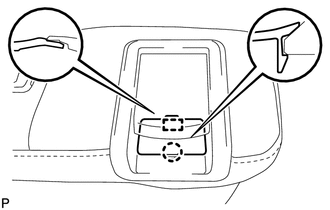
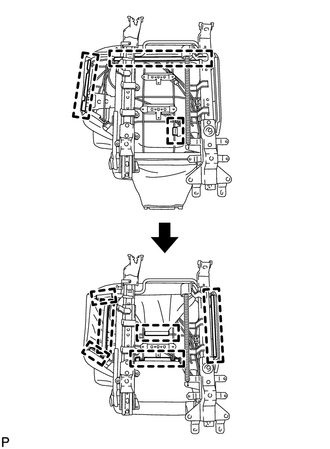
13. INSTALL RECLINING ADJUSTER INSIDE COVER RH
(a) Move the cover in the direction of the arrow to attach the 2 claws.
(b) Attach the clip to install the cover.
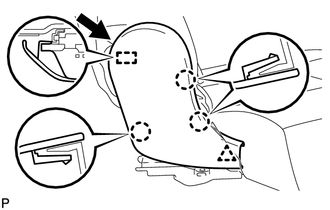
14. INSTALL RECLINING ADJUSTER INSIDE COVER RH
(a) Attach the 2 claws to install the cover.
(b) Install the 2 screws.
15. INSTALL REAR SEAT INNER RECLINING COVER RH
(a) Attach the guide and install the cover with the 2 screws.
16. INSTALL REAR SEATBACK EDGE PROTECTOR
(a) Install the protector to the seatback frame.
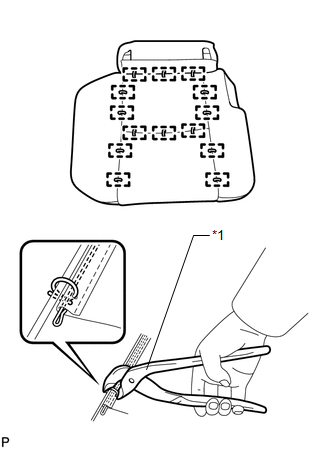
17. INSTALL SEPARATE TYPE REAR SEATBACK COVER
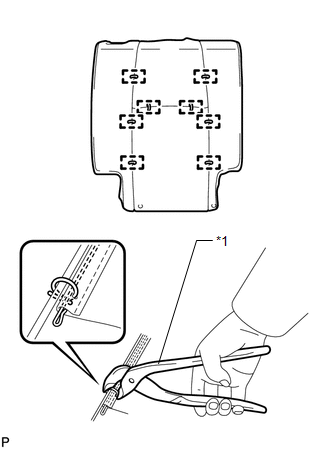
(a) Using hog ring pliers, install the seatback cover to the seatback pad with new hog rings.
Text in Illustration|
*1 |
Hog Ring Pliers |
NOTICE:
- Be careful not to damage the cover.
- When installing the hog rings, avoid wrinkling the cover.
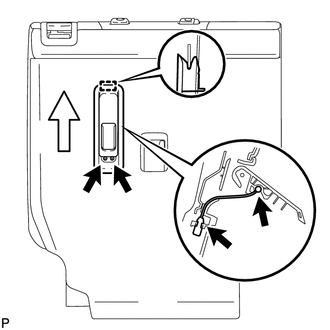
18. INSTALL SEATBACK COVER WITH PAD
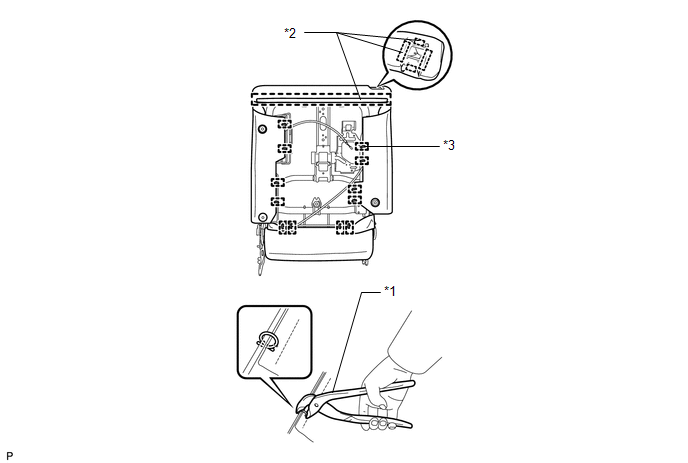
(a) Attach the hooks.
Text in Illustration|
*1 |
Hog Ring Pliers |
|
*2 |
Hook |
|
*3 |
Hog Ring |
(b) Using hog ring pliers, install the seatback cover with pad with 12 new hog rings.
19. INSTALL REAR NO. 1 SEAT HEADREST SUPPORT ASSEMBLY
(a) Attach the 4 claws to install the 2 supports.
20. INSTALL REAR SEATBACK BOARD CARPET ASSEMBLY RH
(a) Attach the 7 clips to install the carpet.
21. INSTALL REAR SEATBACK COVER
(a) Attach the 4 claws to install the cover.
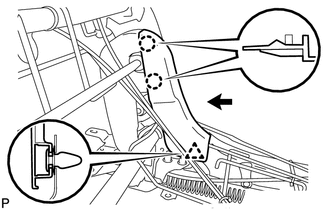
22. INSTALL REAR SEAT LOCK CONTROL LEVER SUB-ASSEMBLY RH
(a) Connect the cable in the order shown in the illustration to install the lever.
(b) Install the 2 screws.
23. INSTALL RECLINING ADJUSTER KNOB CAP RH
(a) Attach the guide and claw to install the cap.
24. INSTALL REAR SEAT LOCK CONTROL LEVER SUB-ASSEMBLY
(a) Attach the cable clamp to connect the cable to the lever.
(b) Move the lever in the direction of the arrow to attach the guide.
(c) Install the lever with the 2 screws.
25. INSTALL REAR SEAT COVER CAP
(a) Attach the guide and claw to install the cap.
26. INSTALL SEPARATE TYPE REAR SEAT CUSHION COVER
(a) Using hog ring pliers, install the seat cushion cover to the seat cushion pad with new 14 hog rings.
Text in Illustration|
*1 |
Hog Ring Pliers |
NOTICE:
- Be careful not to damage the cover.
- When installing the hog rings, avoid wrinkling the cover.
27. INSTALL REAR SEAT CUSHION EDGE PROTECTOR
(a) Install the protector to the cushion spring.
28. INSTALL REAR NO. 2 SEAT PROTECTOR
(a) Install the 2 protectors to the cushion pad.
29. INSTALL SEAT CUSHION COVER WITH PAD
(a) Attach the hooks to install the seat cushion cover with pad.
30. INSTALL REAR SEATBACK LOCK STRIKER COVER RH
(a) Attach the 3 clips to install the cover.
31. INSTALL REAR SEAT INNER BELT ASSEMBLY
32. INSTALL REAR NO. 1 SEAT INNER BELT ASSEMBLY RH
33. INSTALL REAR SEAT REAR CUSHION MOULDING LH
(a) Attach the 2 guides and 3 claws to install the moulding.
(b) Install the screw.
34. INSTALL REAR SEAT CUSHION MOULDING RH
(a) Move the moulding in the direction of the arrow to attach the guide and install the moulding.
(b) Attach the 3 claws and clip.
35. INSTALL RECLINING ADJUSTER RELEASE HANDLE RH
(a) Install the handle with the 3 screws.
36. INSTALL REAR SEAT UPPER RECLINING COVER RH
(a) Attach the 3 claws to install the cover.
 Removal
REMOVAL
CAUTION / NOTICE / HINT
CAUTION:
Wear protective gloves. Sharp areas on the parts may injure your hands.
PROCEDURE
1. REMOVE REAR SEAT HEADREST ASSEMBLY
(a) Remove the headrest.
2. REMO ...
 Installation
INSTALLATION
CAUTION / NOTICE / HINT
CAUTION:
Wear protective gloves. Sharp areas on the parts may injure your hands.
PROCEDURE
1. INSTALL REAR SEAT ASSEMBLY RH
(a) Place the seat in the cabin ...
Other materials about Toyota 4Runner:
Front Airbag Sensor RH Malfunction (B1610/13)
DESCRIPTION
The front airbag sensor RH consists of the diagnostic circuit and frontal deceleration
sensor, etc.
If the center airbag sensor receives signals from the frontal deceleration sensor,
it determines whether the SRS should be activated.
DTC B16 ...
Adjustment
ADJUSTMENT
PROCEDURE
1. INSPECT PARKING BRAKE PEDAL TRAVEL
(a) Fully depress the parking brake pedal to engage the parking brake.
(b) Depress the pedal again to disengage the parking brake.
(c) Slowly depress the parking brake pedal using the specified fo ...
0.0071