Toyota 4Runner: Removal
REMOVAL
CAUTION / NOTICE / HINT
HINT:
- Use the same procedure for the RH and LH sides.
- The procedure listed below is for the LH side.
PROCEDURE
1. DISCONNECT CABLE FROM NEGATIVE BATTERY TERMINAL
CAUTION:
Wait at least 90 seconds after disconnecting the cable from the negative (-) battery terminal to disable the SRS system.
NOTICE:
When disconnecting the cable, some systems need to be initialized after the cable
is reconnected (See page .gif) ).
).
2. REMOVE DOOR SCUFF PLATE ASSEMBLY LH
3. REMOVE FRONT DOOR OPENING TRIM WEATHERSTRIP LH
(a) Partially remove the front door opening trim weatherstrip so that the lower
center pillar garnish and center pillar garnish can be removed (See page
).
4. REMOVE REAR NO. 1 FLOOR STEP COVER (w/ Rear No. 2 Seat)
5. REMOVE QUARTER SCUFF PLATE LH (w/ Rear No. 2 Seat)
6. REMOVE REAR DOOR SCUFF PLATE LH
7. REMOVE REAR DOOR OPENING TRIM WEATHERSTRIP LH
(a) Partially remove the rear door opening trim weatherstrip so that the lower
center pillar garnish and center pillar garnish can be removed (See page
).
8. REMOVE OUTER LAP BELT ANCHOR COVER
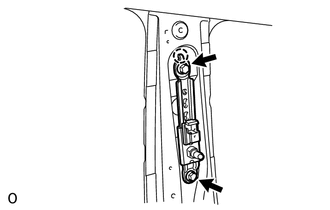
9. REMOVE LOWER CENTER PILLAR GARNISH LH
|
(a) Remove the bolt and disconnect the front seat outer belt floor anchor. |
|
|
(b) Detach the 4 claws and 2 clips and remove the lower center pillar garnish. |
|
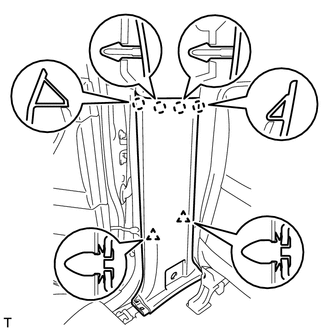
10. REMOVE CENTER PILLAR GARNISH LH
11. REMOVE FRONT SEAT OUTER BELT ASSEMBLY
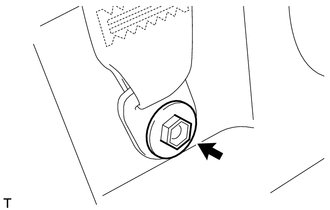
(a) Remove the nut and shoulder anchor.
|
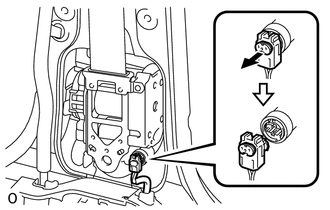
(b) Disconnect the pretensioner connector. |
|
|
(c) Remove the bolt and seat belt. |
|
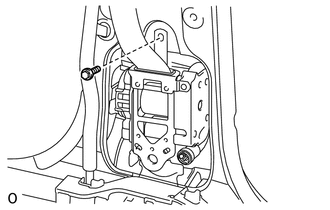
12. REMOVE FRONT SHOULDER BELT ANCHOR PLATE SUB-ASSEMBLY
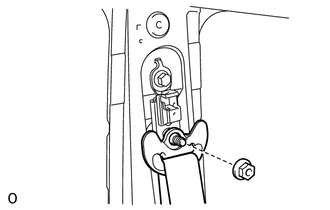
(a) Remove the 2 bolts and anchor plate.
 Precaution
PRECAUTION
CAUTION:
Replace any faulty parts of the seat belt systems (outer belt, inner belt, bolts,
nuts, adjustable shoulder anchor, tether anchor hardware and other related parts).
When insp ...
 Inspection
INSPECTION
PROCEDURE
1. INSPECT FRONT SEAT OUTER BELT ASSEMBLY
CAUTION:
Do not disassemble the retractor.
(a) Before installing the seat belt, check the ELR.
(1) When the inclination of the re ...
Other materials about Toyota 4Runner:
How To Proceed With Troubleshooting
CAUTION / NOTICE / HINT
HINT:
The wireless door lock control system troubleshooting procedures are
based on the premise that the power door lock control system is operating
normally. Check the power door lock control system first before troub ...
Removal
REMOVAL
PROCEDURE
1. REMOVE NO. 1 INSTRUMENT CLUSTER FINISH PANEL GARNISH
2. REMOVE NO. 2 INSTRUMENT CLUSTER FINISH PANEL GARNISH
3. REMOVE HEATER CONTROL ASSEMBLY
4. REMOVE SHIFT LEVER KNOB SUB-ASSEMBLY
5. REMOVE SHIFT LEVER KNOB SUB-ASSEMBL ...
0.0115