
Toyota 4Runner: Clearance Warning Buzzer Circuit
DESCRIPTION
The clearance warning buzzer sounds to alert the driver. The sounding pattern changes depending on the distance to an obstacle.
WIRING DIAGRAM
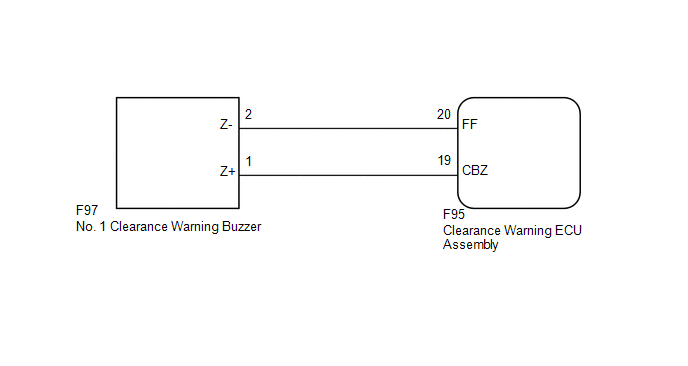
PROCEDURE
|
1. |
CHECK HARNESS AND CONNECTOR (CLEARANCE WARNING ECU ASSEMBLY - NO. 1 CLEARANCE WARNING BUZZER) |
(a) Disconnect the F95 clearance warning ECU assembly connector.
(b) Disconnect the F97 No. 1 clearance warning buzzer connector.
(c) Measure the resistance according to the value(s) in the table below.
Standard Resistance:
|
Tester Connection |
Condition |
Specified Condition |
|---|---|---|
|
F95-19 (CBZ) - F97-1 (Z+) |
Always |
Below 1 Ω |
|
F95-20 (FF) - F97-2 (Z-) |
Always |
Below 1 Ω |
|
F95-19 (CBZ) - Body ground |
Always |
10 kΩ or higher |
|
F95-20 (FF) - Body ground |
Always |
10 kΩ or higher |
| NG | .gif) |
REPAIR OR REPLACE HARNESS OR CONNECTOR |
|
.gif)
|
2. |
CHECK NO. 1 CLEARANCE WARNING BUZZER |
(a) Temporarily replace the No. 1 clearance warning buzzer with a new or normally
functioning one (See page .gif) ).
).
(b) Check that the clearance warning buzzer sounds properly when the intuitive parking assist system detects an obstacle.
OK:
Buzzer sounds properly.
| OK | |
END (NO. 1 CLEARANCE SONAR BUZZER IS DEFECTIVE) |
| NG | |
PROCEED TO NEXT SUSPECTED AREA SHOWN IN PROBLEM SYMPTOMS TABLE |
 Clearance Sonar Main Switch Circuit
DESCRIPTION
When the back sonar or clearance sonar switch assembly turns on, the on signal
is input into the clearance warning ECU assembly.
WIRING DIAGRAM
CAUTION / NOTICE / HINT
NOTICE:
Ins ...
 Indicator Circuit
DESCRIPTION
The warning indicator lights are installed in the combination meter assembly.
WIRING DIAGRAM
CAUTION / NOTICE / HINT
NOTICE:
Inspect the fuses for circuits related to this system be ...
Other materials about Toyota 4Runner:
Installation
INSTALLATION
PROCEDURE
1. INSTALL STABILIZER CONTROL WITH ACCUMULATOR HOUSING ASSEMBLY
(a) Install the stabilizer control with accumulator housing with the 3 bolts.
Torque:
29 N·m {296 kgf·cm, 21 ft·lbf}
(b) Connect the connector, and then attach the ...
Customize Parameters
CUSTOMIZE PARAMETERS
1. CUSTOMIZING FUNCTION WITH TECHSTREAM (REFERENCE)
HINT:
The following items can be customized.
NOTICE:
When the customer requests a change in a function, first make sure that
the function can be customized.
Record th ...

0.0275