Toyota 4Runner: Detachable pole antenna
The antenna can be removed.
Removing the antenna

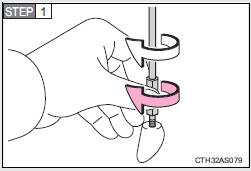
Place the included wrench around the antenna.
When not in use, the wrench is stored in glove box.
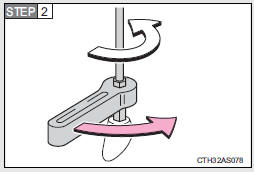
Loosen the antenna with the wrench and remove it.
Installing the antenna
Tighten the antenna by one hand until it will not turn any more.
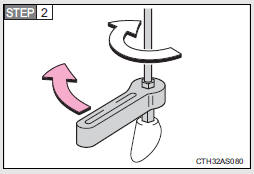
Using the wrench, tighten the antenna an additional 1/8th turn (20 to 45 degrees) to secure it in place.
After tightening the antenna, remove the wrench.
About the wrench
After using the included wrench, store it in the glove box for safekeeping.
NOTICE
To avoid damaging the antenna
Remove the antenna in the following situations.
• When using an automatic carwash.
• When the antenna will touch the ceiling of a garage, etc.
• When covering the vehicle with a car cover.
Removing the antenna
• For normal driving, make sure the antenna is installed.
• When removing the antenna to use an automatic carwash, etc., be careful not to lose the antenna. Also, make sure to reinstall the antenna before driving the vehicle.
Using the wrench
• When installing or removing the antenna, use the included wrench.
• Be careful not to scratch or damage the vehicle body with the wrench.
• Do not over-tighten the antenna.
Over-tightening may damage the antenna.
• Do not use pliers to install or remove the antenna.
Pliers may damage the antenna’s finish.
 Using the steering wheel audio switches
Some audio features can be controlled using the switches on the steering
wheel.
Operation may differ depending on the type of audio system or navigation
system. For details, refer to the manual p ...

Other materials about Toyota 4Runner:
Stabilizer Control Ecu
Components
COMPONENTS
ILLUSTRATION
Removal
REMOVAL
PROCEDURE
1. DISCONNECT CABLE FROM NEGATIVE BATTERY TERMINAL
CAUTION:
Wait at least 90 seconds after disconnecting the cable from the negative (-)
battery terminal to disable the SRS system.
N ...
1-2 Shift (1-2 Shift Valve) (P0781)
DESCRIPTION
The 1-2 shift valve performs shifting to 1st gear and other gears.
DTC Code
DTC Detection Condition
Trouble Area
P0781
Gear required by the ECM does not match the actual gear when drivi ...

0.009