
Toyota 4Runner: Initialization
INITIALIZATION
1. ZERO POINT CALIBRATION
NOTICE:
Make sure that the front passenger seat is not occupied before performing the operation.
HINT:
Perform the zero point calibration and sensitivity check if any of the following conditions apply.
- The occupant classification ECU is replaced.
- Accessories (seatback tray, seat cover, etc.) are installed.
- The front passenger seat is removed from the vehicle.
- The passenger airbag ON/OFF indicator ("OFF") comes on when the front passenger seat is not occupied.
- An occupant classification sensor collision detection DTC is output due to an accident or a collision.
(a) Zero point calibration and sensitivity check procedures
HINT:
Make sure that zero point calibration has finished normally before performing the sensitivity check.
(1) Adjust the seat position according to the table below.
|
Adjustment Component |
Position |
|---|---|
|
Slide Direction |
Rearmost position |
|
Reclining Angle |
Upright position |
|
Headrest Height |
Lowest position |
|
Lifter Height |
Lowest position |
(2) Connect the Techstream to the DLC3.
(3) Turn the ignition switch to ON.
(4) Perform the zero point calibration by following the prompts on the screen.
HINT:
Refer to the Techstream operator's manual for further details.
OK:
"Zero Point Calibration is complete." is displayed.
(5) Perform the sensitivity check by following the prompts on the screen.
(6) Confirm that the beginning sensor reading is within the standard range.
Standard:
-3.2 to 3.2 kg (-7.0 to 7.0 lb)
(7) Place a 30 kg (66.1 lb) weight (eg. a 30 kg (66.1 lb) of lead mass) onto the front passenger seat.
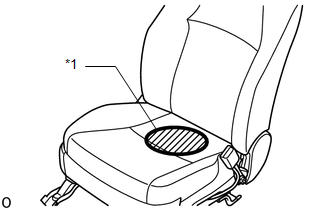
NOTICE:
- Do not allow the weight to come into contact with the seatback when placing it on the seat cushion.
- Place the weight in the area shown in the illustration.
|
*1 |
Weight Position |
(8) Confirm that the sensitivity is within the standard range.
Standard:
27 to 33 kg (59.5 to 72.8 lb)
HINT:
- When performing the sensitivity check, use a solid metal weight (the check result may not appear properly if a liquid weight is used).
- If the sensitivity deviates from the standard range, retighten the bolts of the front passenger seat taking care not to deform the seat rail. After performing this procedure, if the sensitivity is not within the standard range, replace the front seat cushion spring assembly RH.
- If zero point calibration does not finish normally, replace the front seat cushion spring assembly RH.
 How To Proceed With Troubleshooting
CAUTION / NOTICE / HINT
HINT:
*: Use the Techstream.
PROCEDURE
1.
VEHICLE BROUGHT TO WORKSHOP
NEXT
...
 System Description
SYSTEM DESCRIPTION
1. DESCRIPTION OF OCCUPANT CLASSIFICATION SYSTEM
(a) GENERAL DESCRIPTION
(1) In the occupant classification system, the occupant classification ECU calculates
the weight of the ...
Other materials about Toyota 4Runner:
Diagnostic Trouble Code Chart
DIAGNOSTIC TROUBLE CODE CHART
HINT:
If a trouble code is output during the DTC check, inspect the trouble areas listed
for that code. For details of code, refer to the "See page" below.
CAN Communication System
DTC Code
De ...
Reassembly
REASSEMBLY
CAUTION / NOTICE / HINT
HINT:
Use the same procedure for both the RH and LH sides.
The procedure listed below is for the LH side.
PROCEDURE
1. INSTALL NO. 3 OUTSIDE MOULDING RETAINER
2. INSTALL REAR DOOR OUTSIDE MOULDING L ...

0.0276