Toyota 4Runner: Inspection
INSPECTION
PROCEDURE
1. INSPECT FRONT POWER WINDOW REGULATOR MOTOR ASSEMBLY LH
|
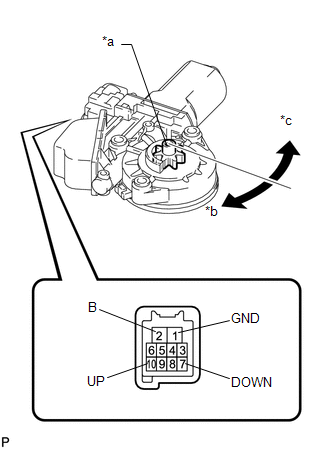
(a) Check that the motor gear rotates smoothly as follows.
NOTICE:
Do not apply positive (+) battery voltage to any terminals except terminal
2 (B) to avoid damaging the pulse sensor inside the motor.
OK:
|
Measurement Condition
|
Specified Condition
|
- Connect the positive (+) battery terminal to terminal
2 (B), and connect the negative (-) battery terminal to
terminal 1 (GND), and keep them connected for 3 seconds
or more.
- With terminals 2 (B) and 1 (GND) connected to the battery,
connect the negative (-) battery terminal to terminal 10
(UP).
- Disconnect and reconnect the negative (-) battery terminal
to terminal 10 (UP) within 1 second.
|
Motor gear rotates clockwise (Up)
|
- Connect the positive (+) battery terminal to terminal
2 (B), and connect the negative (-) battery terminal to
terminal 1 (GND), and keep them connected for 3 seconds
or more.
- With terminals 2 (B) and 1 (GND) connected to the battery,
connect the negative (-) battery terminal to terminal 7
(DOWN).
- Disconnect and reconnect the negative (-) battery terminal
to terminal 7 (DOWN) within 1 second.
|
Motor gear rotates counterclockwise (Down)
|
- If the result is not as specified, replace the front power window
regulator motor assembly.
CAUTION:
Reset the power window regulator motor (initialize the pulse sensor)
after installing the power window regulator motor and regulator assembly
to the door.
Text in Illustration
|
*a
|
Motor Gear
|
|
*b
|
Clockwise
|
|
*c
|
Counterclockwise
|
|
|
2. INSPECT FRONT POWER WINDOW REGULATOR MOTOR ASSEMBLY RH
|
(a) Check that the motor gear rotates smoothly as follows.
NOTICE:
Do not apply positive (+) battery voltage to any terminals except terminal
2 (B) to avoid damaging the pulse sensor inside the motor.
OK:
|
Measurement Condition
|
Specified Condition
|
- Connect the positive (+) battery terminal to terminal
2 (B), and connect the negative (-) battery terminal to
terminal 1 (GND), and keep them connected for 3 seconds
or more.
- With terminals 2 (B) and 1 (GND) connected to the battery,
connect the negative (-) battery terminal to terminal 10
(UP).
- Disconnect and reconnect the negative (-) battery terminal
to terminal 10 (UP) within 1 second.
|
Motor gear rotates counterclockwise (Up)
|
- Connect the positive (+) battery terminal to terminal
2 (B), and connect the negative (-) battery terminal to
terminal 1 (GND), and keep them connected for 3 seconds
or more.
- With terminals 2 (B) and 1 (GND) connected to the battery,
connect the negative (-) battery terminal to terminal 7
(DOWN).
- Disconnect and reconnect the negative (-) battery terminal
to terminal 7 (DOWN) within 1 second.
|
Motor gear rotates clockwise (Down)
|
- If the result is not as specified, replace the front power window
regulator motor assembly.
CAUTION:
Reset the power window regulator motor (initialize the pulse sensor)
after installing the power window regulator motor and regulator assembly
to the door.
Text in Illustration
|
*a
|
Motor Gear
|
|
*b
|
Clockwise
|
|
*c
|
Counterclockwise
|
|
|
COMPONENTS
ILLUSTRATION
ILLUSTRATION
...
REMOVAL
PROCEDURE
1. DISCONNECT CABLE FROM NEGATIVE BATTERY TERMINAL
CAUTION:
Wait at least 90 seconds after disconnecting the cable from the negative (-)
battery terminal to disable the SRS sys ...
Other materials about Toyota 4Runner:
Terminals Of Ecu
TERMINALS OF ECU
1. CHECK POWER MANAGEMENT CONTROL ECU
(a) Disconnect the F80 power management control ECU connector.
(b) Measure the voltage and resistance according to the value(s) in the table
below.
Terminal No. (Symbol)
Wirin ...
Precaution
PRECAUTION
1. IGNITION SWITCH EXPRESSION
(a) The type of ignition switch used on this model differs depending on the specifications
of the vehicle. The expressions listed in the table below are used in this section.
Expression
Igniti ...

 Components
 Removal