
Toyota 4Runner: Removal
REMOVAL
PROCEDURE
1. DISCONNECT CABLE FROM NEGATIVE BATTERY TERMINAL
CAUTION:
Wait at least 90 seconds after disconnecting the cable from the negative (-) battery terminal to disable the SRS system.
NOTICE:
When disconnecting the cable, some systems need to be initialized after the cable
is reconnected (See page .gif) ).
).
2. REMOVE FRONT DOOR LOWER FRAME BRACKET GARNISH LH
3. REMOVE NO. 2 DOOR INSIDE HANDLE BEZEL LH
4. REMOVE FRONT DOOR TRIM BOARD SUB-ASSEMBLY LH
5. REMOVE FRONT DOOR INNER GLASS WEATHERSTRIP LH
6. REMOVE FRONT NO. 1 SPEAKER ASSEMBLY
7. REMOVE FRONT DOOR SERVICE HOLE COVER LH
8. REMOVE FRONT DOOR GLASS SUB-ASSEMBLY LH
9. REMOVE FRONT DOOR WINDOW REGULATOR SUB-ASSEMBLY LH
10. REMOVE FRONT POWER WINDOW REGULATOR MOTOR ASSEMBLY LH
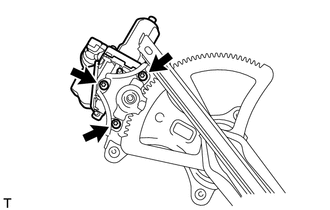
(a) Using a T25 "TORX" socket wrench, remove the 3 screws and power window regulator motor.
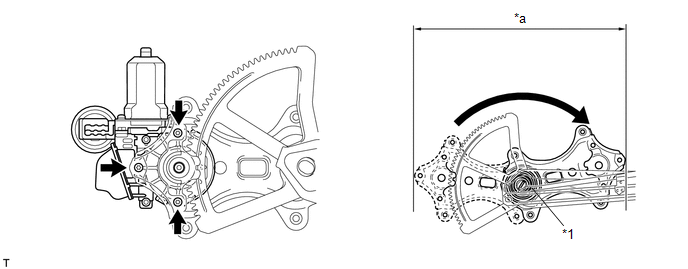 Text in Illustration
|
*1 |
Spring |
- |
- |
|
*a |
Range of Movement |
- |
- |
CAUTION:
Do not place your finger, etc. within the range of movement of the window regulator. When removing the power window regulator motor, the force of the spring causes the window regulator to move in the direction of the arrow shown in the illustration (the direction in which the window rises), which may cause injury.
NOTICE:
Be careful when removing the screws as the motor may fall and become damaged.
 Inspection
INSPECTION
PROCEDURE
1. INSPECT FRONT POWER WINDOW REGULATOR MOTOR ASSEMBLY LH
(a) Check that the motor gear rotates smoothly as follows.
NOTICE:
Do not apply positive (+) battery ...
 Installation
INSTALLATION
PROCEDURE
1. INSTALL FRONT POWER WINDOW REGULATOR MOTOR ASSEMBLY LH
NOTICE:
The regulator arm must be below the intermediate position when installing the
power window regulator moto ...
Other materials about Toyota 4Runner:
Installation
INSTALLATION
CAUTION / NOTICE / HINT
HINT:
A bolt without a torque specification is shown in the standard bolt chart (See
page ).
PROCEDURE
1. INSTALL POWER MANAGEMENT CONTROL ECU
(a) Attach the 2 claws to install the power management control ECU.
2. ...
LIN Communication Master Malfunction (B2287,B278C)
DESCRIPTION
DTC B2287 is stored when there is an open or short circuit or an ECU
communication malfunction between the power management control ECU and certification
ECU.
DTC B278C is stored when LIN communication between the certification ...

0.0068