Toyota 4Runner: Installation
INSTALLATION
CAUTION / NOTICE / HINT
HINT:
- Use the same procedure for the RH and LH sides.
- The procedure listed below is for the LH side.
- A bolt without a torque specification is shown in the standard bolt
chart (See page
.gif) ).
).
PROCEDURE
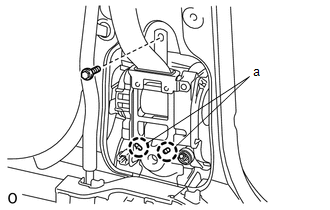
1. INSTALL FRONT SHOULDER BELT ANCHOR PLATE SUB-ASSEMBLY LH
(a) Align the anchor plate positioning hole with the claw and install the anchor plate with the 2 bolts.
Torque:
42 N·m {428 kgf·cm, 31 ft·lbf}
HINT:
First install the lower bolt, and then install the upper bolt.
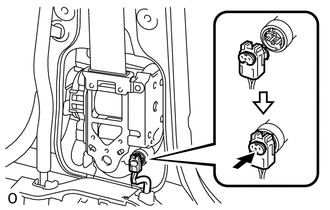
2. INSTALL FRONT SEAT OUTER BELT ASSEMBLY LH
NOTICE:
When installing the retractor, make sure the claws of the vehicle (labeled "a" in the illustration) only contact the installation areas of the retractor.
(a) Align the seat belt retractor positioning holes with the claws of the vehicle.
(b) Install the seat belt with the bolt.
Torque:
7.5 N·m {76 kgf·cm, 66 in·lbf}
|
(c) Connect the pretensioner connector. |
|
(d) Install the shoulder anchor to the shoulder belt anchor adjuster with the nut.
Torque:
42 N·m {428 kgf·cm, 31 ft·lbf}
3. INSTALL CENTER PILLAR GARNISH LH
4. INSTALL LOWER CENTER PILLAR GARNISH LH
(a) Attach the 4 claws and 2 clips to install the lower center pillar garnish.
(b) Install the front seat outer belt floor anchor with the bolt.
Torque:
42 N·m {428 kgf·cm, 31 ft·lbf}
5. INSTALL OUTER LAP BELT ANCHOR COVER
6. INSTALL REAR DOOR OPENING TRIM WEATHERSTRIP LH
7. INSTALL REAR DOOR SCUFF PLATE LH
8. INSTALL QUARTER SCUFF PLATE LH (w/ Rear No. 2 Seat)
9. INSTALL REAR NO. 1 FLOOR STEP COVER (w/ Rear No. 2 Seat)
10. INSTALL FRONT DOOR OPENING TRIM WEATHERSTRIP LH
11. INSTALL DOOR SCUFF PLATE ASSEMBLY LH
12. CONNECT CABLE TO NEGATIVE BATTERY TERMINAL
NOTICE:
When disconnecting the cable, some systems need to be initialized after the cable
is reconnected (See page ).
13. CHECK SRS WARNING LIGHT
(a) Check the SRS warning light (See page ).
 Inspection
INSPECTION
PROCEDURE
1. INSPECT FRONT SEAT OUTER BELT ASSEMBLY
CAUTION:
Do not disassemble the retractor.
(a) Before installing the seat belt, check the ELR.
(1) When the inclination of the re ...
 Disposal
DISPOSAL
CAUTION / NOTICE / HINT
HINT:
When scrapping vehicles equipped with a seat belt pretensioner or disposing of
a front seat outer belt (with seat belt pretensioner), always activate the se ...
Other materials about Toyota 4Runner:
Reassembly
REASSEMBLY
PROCEDURE
1. INSTALL NO. 1 COOLER THERMISTOR
NOTICE:
If reusing the evaporator, do not insert the sensor into a location where the
sensor was previously inserted.
(a) Insert the sensor to a location that is 1 fin to the right or left of its ...
Shifting between H2 and H4
Shifting from H2 to H4
Type A
Reduce vehicle speed to less
than 50 mph (80 km/h).
Shift the front-wheel drive
control lever to H4.
Type B
Reduce vehicle speed to less
than 62 mph (100 km/h).
Push the “UNLOCK” button and
turn the front-whee ...

0.0082