Toyota 4Runner: Installation
INSTALLATION
CAUTION / NOTICE / HINT
HINT:
- Use the same procedure for the RH and LH sides.
- The procedure listed below is for the LH side.
PROCEDURE
1. INSTALL CURTAIN SHIELD AIRBAG ASSEMBLY LH (w/ Rear No. 2 Seat)
(a) Install the curtain shield airbag with the new 14 bolts.
Torque:
9.8 N·m {100 kgf·cm, 87 in·lbf}
NOTICE:
Do not twist the curtain shield airbag when installing it.
|
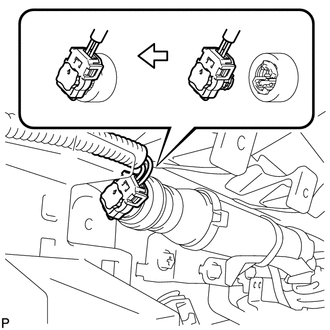
(b) Connect the connector. NOTICE: When handling the airbag connector, take care not to damage the airbag wire harness. |
|
2. INSTALL CURTAIN SHIELD AIRBAG ASSEMBLY LH (w/o Rear No. 2 Seat)
(a) Install the curtain shield airbag with the new 11 bolts.
Torque:
9.8 N·m {100 kgf·cm, 87 in·lbf}
NOTICE:
Do not twist the curtain shield airbag when installing it.
|
(b) Connect the connector. NOTICE: When handling the airbag connector, take care not to damage the airbag wire harness. |
|
3. INSTALL ROOF HEADLINING ASSEMBLY
(a) Install the roof headlining (See page .gif) ).
).
 On-vehicle Inspection
ON-VEHICLE INSPECTION
CAUTION / NOTICE / HINT
HINT:
Use the same procedure for the RH and LH sides.
The procedure listed below is for the LH side.
PROCEDURE
1. CHECK CURTAIN SHI ...
 Removal
REMOVAL
CAUTION / NOTICE / HINT
HINT:
Use the same procedure for the RH and LH sides.
The procedure listed below is for the LH side.
PROCEDURE
1. REMOVE ROOF HEADLINING ASSEMBLY ...
Other materials about Toyota 4Runner:
Do-it-yourself service precautions
If you perform maintenance by yourself, be sure to follow the correct
procedure as given in these sections.
CAUTION
The engine compartment contains many mechanisms and fluids that may move
suddenly, become hot, or become electrically energized. To av ...
Disposal
DISPOSAL
CAUTION / NOTICE / HINT
CAUTION:
Before performing pre-disposal deployment of any SRS part, review and closely
follow all applicable environmental and hazardous material regulations. Pre-disposal
deployment may be considered hazardous material ...

0.0108