Toyota 4Runner: Removal
REMOVAL
CAUTION / NOTICE / HINT
HINT:
- Use the same procedure for the RH and LH sides.
- The procedure listed below is for the LH side.
PROCEDURE
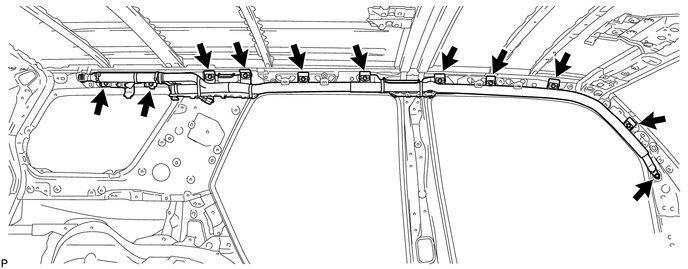
1. REMOVE ROOF HEADLINING ASSEMBLY
(a) Remove the roof headlining assembly (See page
.gif) ).
).
2. REMOVE CURTAIN SHIELD AIRBAG ASSEMBLY LH (w/o Rear No. 2 Seat)
|
(a) Disconnect the connector. NOTICE: When handling the airbag connector, take care not to damage the airbag wire harness. |
|
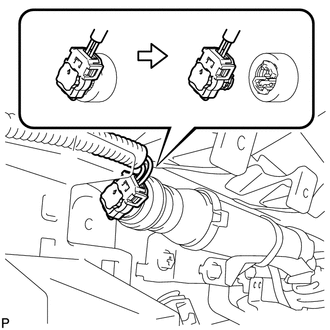
(b) Remove the 11 bolts and curtain shield airbag.
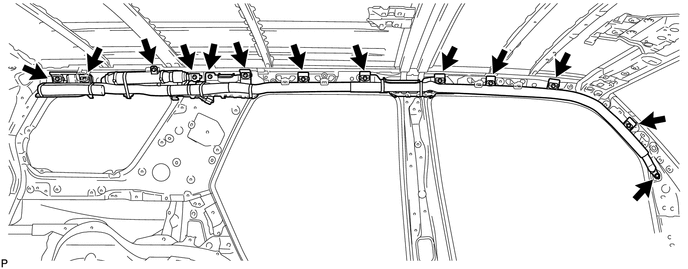
3. REMOVE CURTAIN SHIELD AIRBAG ASSEMBLY LH (w/ Rear No. 2 Seat)
|
(a) Disconnect the connector. NOTICE: When handling the airbag connector, take care not to damage the airbag wire harness. |
|
(b) Remove the 14 bolts and curtain shield airbag.
 Installation
INSTALLATION
CAUTION / NOTICE / HINT
HINT:
Use the same procedure for the RH and LH sides.
The procedure listed below is for the LH side.
PROCEDURE
1. INSTALL CURTAIN SHIELD AIR ...
 Disposal
DISPOSAL
CAUTION / NOTICE / HINT
CAUTION:
Before performing pre-disposal deployment of any SRS part, review and closely
follow all applicable environmental and hazardous material regulations. Pre ...
Other materials about Toyota 4Runner:
Open in Outside Luggage Compartment Electrical Key Antenna Circuit (B27A8)
DESCRIPTION
The certification ECU generates a request signal and transmits the signal to
the electrical key antenna (outside luggage). The electrical key antenna (outside
luggage) detects that the electrical key is brought close to the vehicle, and when
...
GPS Signal Unreceived (B1583)
DESCRIPTION
If GPS satellite signals cannot be acquired for 24 consecutive kilometers (15
consecutive miles), this DTC is set.
DTC Code
DTC Detection Condition
Trouble Area
B1583
GPS signal is no ...

0.0077