Toyota 4Runner: Removal
REMOVAL
CAUTION / NOTICE / HINT
HINT:
- Use the same procedure for both the RH and LH sides.
- The procedure listed below is for the LH side.
PROCEDURE
1. REMOVE UPPER RADIATOR SUPPORT SEAL
.gif)
2. REMOVE FRONT FENDER MAIN SEAL LH
3. REMOVE FRONT FENDER MAIN SEAL RH
HINT:
Use the same procedure as for the LH side.
4. REMOVE FRONT BUMPER COVER (w/o Intuitive Parking Assist System)
(See page )
5. REMOVE FRONT BUMPER COVER (w/ Intuitive Parking Assist System)
(See page )
6. REMOVE HEADLIGHT ASSEMBLY LH
|
(a) Remove the 3 screws and bolt. |
|
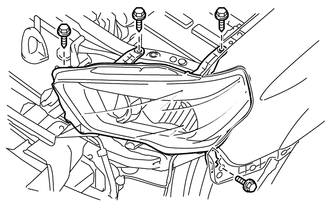
(b) Disconnect the 4 connectors and remove the headlight assembly LH.
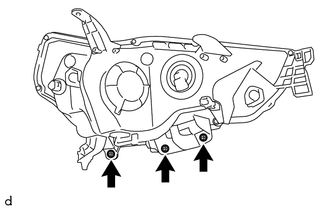
7. REMOVE FRONT BUMPER BAR REINFORCEMENT LH (w/o Intuitive Parking Assist System)
|
(a) Remove the 3 screws and front bumper bar reinforcement LH. |
|
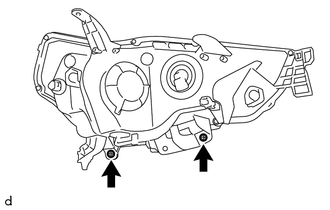
8. REMOVE FRONT BUMPER BAR REINFORCEMENT LH (w/ Intuitive Parking Assist System)
|
(a) Remove the 2 screws and front bumper bar reinforcement LH. |
|
 Disassembly
DISASSEMBLY
CAUTION / NOTICE / HINT
HINT:
Use the same procedure for both the RH and LH sides.
The procedure listed below is for the LH side.
PROCEDURE
1. REMOVE NO. 1 HEADLIGHT ...
 Adjustment
ADJUSTMENT
CAUTION / NOTICE / HINT
HINT:
Use the same procedure for the RH and LH sides.
The procedure listed below is for the LH side.
PROCEDURE
1. VEHICLE PREPARATION FOR HEAD ...
Other materials about Toyota 4Runner:
Room Light(for Rear)
Components
COMPONENTS
ILLUSTRATION
Installation
INSTALLATION
PROCEDURE
1. INSTALL NO. 1 ROOM LIGHT ASSEMBLY
(a) Align the switch parts as shown in the illustration and attach the
4 claws to install the room light switch base to the ...
Acceleration Sensor Internal Circuit (C1419,C1435)
DESCRIPTION
The skid control ECU receives signals from the yaw rate and acceleration sensor
via the CAN communication system.
The yaw rate and acceleration sensor has a built-in acceleration sensor and detects
the vehicle condition using 2 circuits (GL1, ...

0.0228