Toyota 4Runner: Removal
REMOVAL
PROCEDURE
1. DISCONNECT CABLE FROM NEGATIVE BATTERY TERMINAL
CAUTION:
Wait at least 90 seconds after disconnecting the cable from the negative (-) battery terminal to disable the SRS system.
NOTICE:
When disconnecting the cable, some systems need to be initialized after the cable
is reconnected (See page .gif) ).
).
2. REMOVE REAR NO. 1 SEAT ASSEMBLY
(a) for 60/40 Split Double-folding Seat Type LH Side
(1) Remove the rear No. 1 seat assembly (See page
).
(b) for 60/40 Split Double-folding Seat Type RH Side
(1) Remove the rear No. 1 seat assembly (See page
).
(c) for 60/40 Split Slide Walk-in Seat Type LH Side
(1) Remove the rear No. 1 seat assembly (See page
).
(d) for 60/40 Split Slide Walk-in Seat Type RH Side
(1) Remove the rear No. 1 seat assembly (See page
).
3. REMOVE REAR NO. 1 FLOOR STEP COVER (w/ Rear No. 2 Seat)
4. REMOVE QUARTER SCUFF PLATE LH (w/ Rear No. 2 Seat)
5. REMOVE QUARTER SCUFF PLATE RH (w/ Rear No. 2 Seat)
6. REMOVE REAR DOOR SCUFF PLATE LH
7. REMOVE REAR DOOR SCUFF PLATE RH
8. REMOVE REAR FLOOR SIDE AIRBAG SENSOR COVER
(a) Fold back the floor carpet.
|
(b) Detach the clip and claw, and remove the cover. |
|
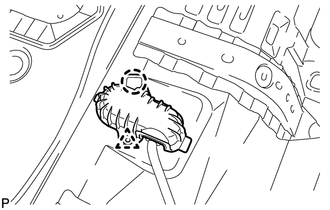
9. REMOVE REAR FLOOR SIDE AIRBAG SENSOR
|
(a) Remove the bolt and sensor. |
|
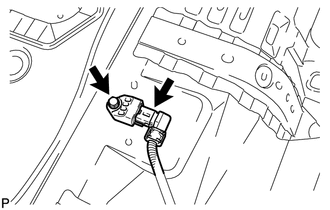
(b) Disconnect the connector.
 Installation
INSTALLATION
PROCEDURE
1. INSTALL REAR FLOOR SIDE AIRBAG SENSOR
(a) Turn the ignition switch off.
(b) Disconnect the cable from the negative (-) battery terminal.
CAUTION:
Wait at least 90 secon ...

Other materials about Toyota 4Runner:
Removal
REMOVAL
CAUTION / NOTICE / HINT
NOTICE:
Take extra care when handling these precision electronic components.
PROCEDURE
1. REMOVE TRANSMITTER HOUSING COVER
NOTICE:
Take extra care when handling these precision electronic components.
(a) Twist ...
Terminals Of Ecu
TERMINALS OF ECU
1. AIR CONDITIONING AMPLIFIER
(a) Measure the voltage and resistance according to the value(s) in the table
below.
Terminal No. (Symbol)
Wiring Color
Terminal Description
Condition
...

0.0116