Toyota 4Runner: Removal
REMOVAL
CAUTION / NOTICE / HINT
NOTICE:
- When installing, coat the parts indicated by arrows with lithium soap
base glycol grease (See page
.gif) ).
). - As high pressure is applied to the brake actuator tube No. 1, never deform it.
- Do not turn the ignition switch ON until the procedures are completed.
- Before starting the work, make sure that the ignition switch is off and depress the brake pedal more than 20 times.
HINT:
When pressure in the power supply system is released, the reaction force decreases and the stroke becomes longer.
PROCEDURE
1. DISCONNECT CABLE FROM NEGATIVE BATTERY TERMINAL
CAUTION:
Wait at least 90 seconds after disconnecting the cable from the negative (-) battery terminal to disable the SRS system.
NOTICE:
When disconnecting the cable, some systems need to be initialized after the cable
is reconnected (See page ).
2. DRAIN BRAKE FLUID
NOTICE:
Wash off brake fluid immediately if it comes into contact with a painted surface.
3. REMOVE LOWER NO. 1 INSTRUMENT PANEL AIRBAG ASSEMBLY
(a) Remove the lower No. 1 instrument panel airbag assembly (See page
).
4. REMOVE PUSH ROD PIN
(a) Remove the clip and push rod pin from the brake pedal lever.
5. REMOVE HYDRAULIC BRAKE BOOSTER ASSEMBLY
|
(a) Disconnect the 3 connectors from the hydraulic brake booster assembly. |
|
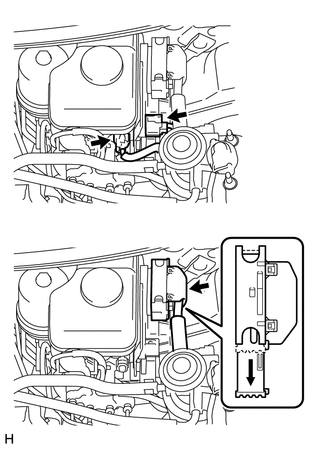
|
(b) Use tags or make a memo to identify the place to reconnect. HINT:
|
|
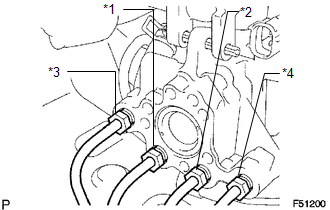
|
(c) Using a union nut wrench, disconnect the 4 brake lines from the hydraulic brake booster assembly. |
|
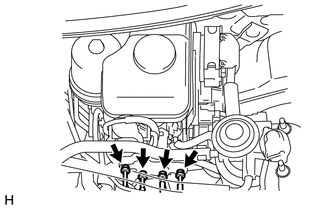
|
(d) Remove the 4 nuts and pull out the hydraulic brake booster assembly. |
|
.png)
6. REMOVE BRAKE BOOSTER GASKET
(a) Remove the brake booster gasket from the brake master cylinder.
 On-vehicle Inspection
ON-VEHICLE INSPECTION
PROCEDURE
1. INSPECT BRAKE MASTER CYLINDER FLUID PRESSURE CHANGE
(a) Inspect the battery voltage.
Battery voltage:
11 to 14 V
...
 Disassembly
DISASSEMBLY
PROCEDURE
1. REMOVE NO. 1 BRAKE ACTUATOR BRACKET
(a) Using a 5 mm hexagon wrench, remove the bolt and No. 1 brake actuator
bracket.
...
Other materials about Toyota 4Runner:
Diagnostic Trouble Code Chart
DIAGNOSTIC TROUBLE CODE CHART
HINT:
If a trouble code is output during the DTC check, inspect the trouble areas listed
for that code. For details of the code, refer to the "See page" below.
Sliding Roof System
DTC Code
Det ...
Meter Illumination does not Dim at Night
DESCRIPTION
If the dimmer switch is turned to TAIL, HEAD or AUTO, the main body ECU sends
a TAIL relay signal, panel light illumination signal, panel relay signal and TAIL
cancel OFF signal to the combination meter. Then the meter and accessory meter beco ...

0.0261