Toyota 4Runner: Removal
REMOVAL
PROCEDURE
1. REMOVE REAR CONSOLE BOX ASSEMBLY
(a) Remove the rear console box (See page .gif) ).
).
2. DISCONNECT TRANSMISSION CONTROL CABLE ASSEMBLY
(a) Move the shift lever to N.
|
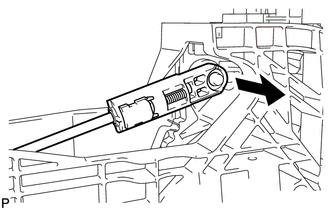
(b) Disconnect the transmission control cable end from the shift lever. |
|
|
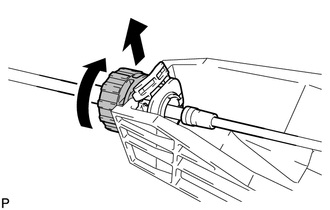
(c) Rotate the socket counterclockwise approximately 180° and, while holding the nut in that position, disconnect the transmission control cable from the shift lever retainer. NOTICE: Do not over-rotate the nut as it will come off the internal spring and the transmission control cable will not be reusable. |
|
3. REMOVE TRANSMISSION FLOOR SHIFT ASSEMBLY
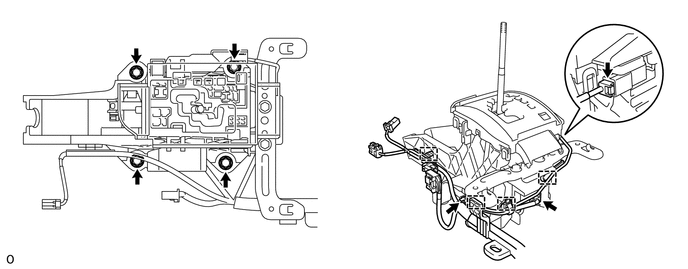
(a) Disconnect the 3 connectors and detach the 4 wire harness clamps.
(b) Remove the 4 bolts and transmission floor shift.
4. REMOVE NO. 1 CONSOLE BOX MOUNTING BRACKET
(a) Remove the 2 screws and console box mounting bracket.
 On-vehicle Inspection
ON-VEHICLE INSPECTION
PROCEDURE
1. CHECK SHIFT LOCK OPERATION
(a) Move the shift lever to P.
(b) Turn the ignition switch off.
(c) Check that the shift lever cannot be moved from P.
(d) Turn the ...
 Disassembly
DISASSEMBLY
PROCEDURE
1. REMOVE SHIFT LEVER CAP
2. REMOVE POSITION INDICATOR HOUSING ASSEMBLY
(a) Detach the 4 claws and remove the floor shift position indicator
housing.
...
Other materials about Toyota 4Runner:
Diagnostic Trouble Code Chart
DIAGNOSTIC TROUBLE CODE CHART
HINT:
If a trouble code is output during the DTC check, inspect the trouble areas for
that code. For details of the code, refer to the "See page" below.
DTC Code
Detection Item
See p ...
Installation
INSTALLATION
PROCEDURE
1. INSTALL FRONT DRIVE SHAFT ASSEMBLY
(a) Coat the spline of the inboard joint shaft assembly with ATF.
(b) Align the shaft splines and install the drive shaft with a brass bar and
hammer.
NOTICE:
Set the snap ring with ...

0.0261