Toyota 4Runner: Satellite Radio Antenna
Components
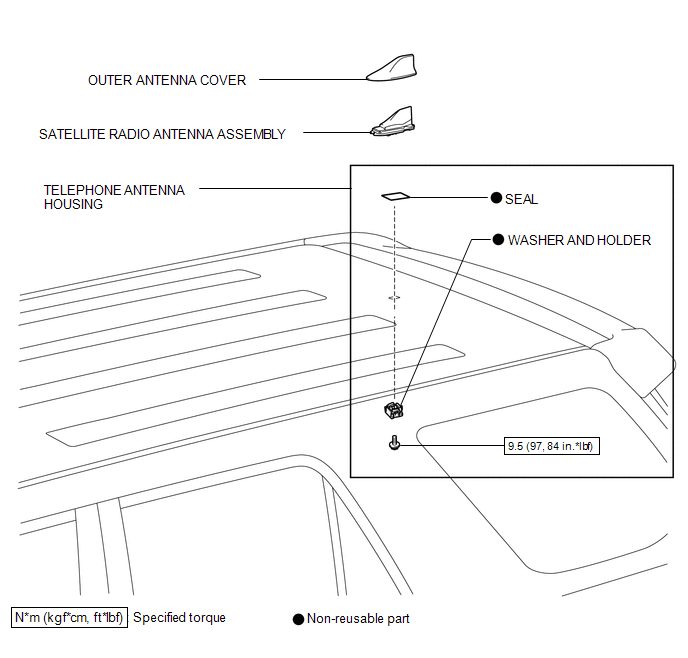
COMPONENTS
ILLUSTRATION
Removal
REMOVAL
PROCEDURE
1. DISCONNECT CABLE FROM NEGATIVE BATTERY TERMINAL
CAUTION:
Wait at least 90 seconds after disconnecting the cable from the negative (-) battery terminal to disable the SRS system.
NOTICE:
When disconnecting the cable, some systems need to be initialized after the cable
is reconnected (See page .gif) ).
).
2. REMOVE ROOF HEADLINING ASSEMBLY
(See page )
3. REMOVE SATELLITE RADIO ANTENNA ASSEMBLY
|
(a) Disconnect the connector. |
|
(b) Remove the bolt, washer and holder and satellite radio antenna assembly.
|
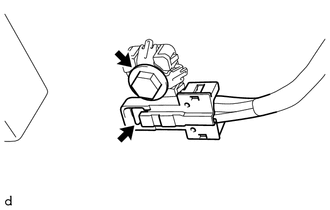
(c) Disengage the 3 claws and 3 guides to remove the satellite radio antenna assembly from outer antenna cover. |
|
|
(d) When reusing the roof antenna assembly: (1) Remove the seal. |
|

Installation
INSTALLATION
PROCEDURE
1. INSTALL SATELLITE RADIO ANTENNA ASSEMBLY
(a) When reusing the roof antenna assembly:
(1) Install a new seal.
(b) Engage the 3 guides and 3 claws to install the satellite radio antenna assembly to outer antenna cover.
(c) Temporarily install the satellite radio antenna assembly on the vehicle.
(d) Install a new washer and holder with the bolt.
Torque:
9.5 N·m {97 kgf·cm, 84 in·lbf}
(e) Connect the connector.
2. INSTALL ROOF HEADLINING ASSEMBLY
(See page .gif) )
)
3. CONNECT CABLE TO NEGATIVE BATTERY TERMINAL
NOTICE:
When disconnecting the cable, some systems need to be initialized after the cable
is reconnected (See page ).
4. CHECK SRS WARNING LIGHT
(See page )
 Rear Door Speaker
Components
COMPONENTS
ILLUSTRATION
Removal
REMOVAL
CAUTION / NOTICE / HINT
HINT:
Use the same procedure for the RH and LH sides.
The procedure listed below is for the LH side. ...

Other materials about Toyota 4Runner:
Installation
INSTALLATION
CAUTION / NOTICE / HINT
HINT:
Use the same procedure for the RH and LH sides.
The procedure listed below is for the LH side.
When installing the window frame moulding, black out tape and outside
stripe, heat the vehicle body ...
Removal
REMOVAL
PROCEDURE
1. REMOVE NO. 1 ENGINE UNDER COVER SUB-ASSEMBLY
2. REMOVE REAR ENGINE UNDER COVER ASSEMBLY
3. REMOVE FRONT FENDER APRON SEAL RH
4. REMOVE FRONT NO. 1 FENDER APRON TO FRAME SEAL RH
5. REMOVE NO. 1 OIL COOLER INLET HOSE AND NO ...

0.0275