Toyota 4Runner: Dtc Check / Clear
DTC CHECK / CLEAR
1. CHECK DTC (Using SST Check Wire)
(a) Check for DTCs (present trouble code).
(1) Turn the ignition switch to ON and wait for approximately 60 seconds.
(2) Using SST, connect terminals 13 (TC) and 4 (CG) of the DLC3.
SST: 09843-18040
NOTICE:
Connect the correct terminals to avoid a malfunction.
(b) Check for DTCs (past trouble code).
(1) Using SST, connect terminals 13 (TC) and 4 (CG) of the DLC3.
SST: 09843-18040
NOTICE:
Connect the correct terminals to avoid a malfunction.
(2) Turn the ignition switch to ON and wait for approximately 60 seconds.
(c) Read the DTCs.
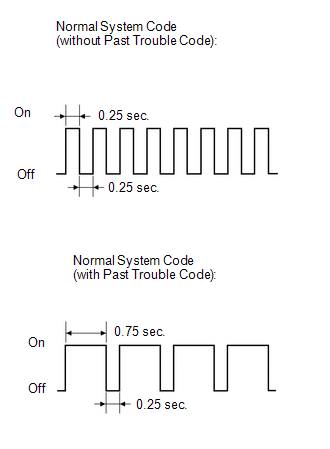
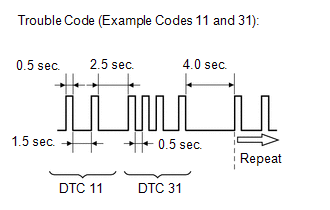
(1) Read the blinking patterns of the DTCs. As examples, the blinking patterns for the normal system code and trouble codes 11 and 31 are shown in the illustration.
- Normal system code indication (without past trouble code):
The light blinks twice per second.
- Normal system code indication (with past trouble code):
When a past trouble code is stored in the center airbag sensor, the light blinks only once per second.
- Trouble code indication:
Each digit of a DTC is separated by a 1.5 second pause.
If there is more than 1 code, there is a 2.5 second pause between each code. After all the codes are output, there is a 4.0 second pause, and then all the codes are repeated.
HINT:
- If 2 or more malfunctions are found, the indication begins with the smaller-numbered code.
- If DTCs are output without connecting the terminals, proceed to "Diagnosis
Circuit" (See page
.gif) ).
).
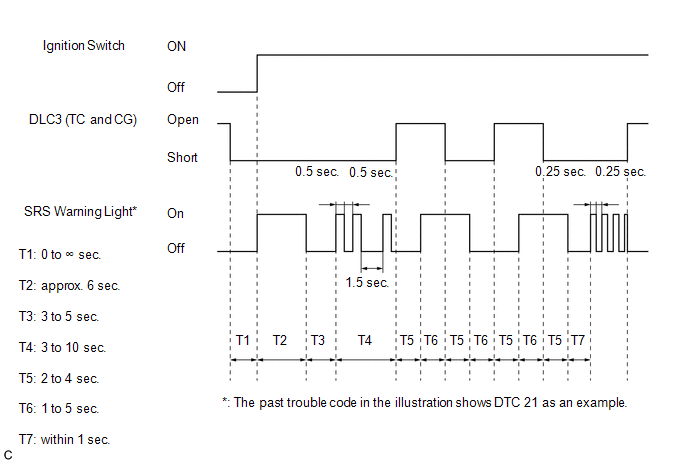
2. CLEAR DTC (Using SST Check Wire)
(a) When the ignition switch is turned off, the DTCs are cleared.
HINT:
Depending on the DTC, the code may not be cleared by turning off the ignition switch. In this case, proceed to the next step.
(b) Using SST, connect terminals 13 (TC) and 4 (CG) of the DLC3, and then turn the ignition switch to ON.
SST: 09843-18040
(c) Disconnect terminal TC of the DLC3 within 3 to 10 seconds after the DTCs are output and check that the SRS warning light comes on after 3 seconds.
(d) Within 2 to 4 seconds after the SRS warning light comes on, connect terminals 13 (TC) and 4 (CG) of the DLC3.
(e) Check that the SRS warning light goes off within 2 to 4 seconds after connecting terminals 13 (TC) and 4 (CG) of the DLC3. Then, disconnect terminal 13 (TC) within 2 to 4 seconds after the SRS warning light goes off.
(f) Check that the SRS warning light comes on again within 2 to 4 seconds after disconnecting terminal 13 (TC). Then, reconnect terminals 13 (TC) and 4 (CG) within 2 to 4 seconds after the SRS warning light comes on.
(g) Check that the SRS warning light goes off within 2 to 4 seconds after connecting terminals 13 (TC) and 4 (CG) of the DLC3. Also check that the normal system code is output within 1 second after the SRS warning light goes off.
If DTCs are not cleared, repeat this procedure until the codes are cleared.
3. CHECK DTC (Using the Techstream)
(a) Connect the Techstream to the DLC3.
(b) Turn the ignition switch to ON.
(c) Turn the Techstream on.
(d) Enter the following menus: Body / SRS Airbag / Trouble Codes.
4. CLEAR DTC (Using the Techstream)
(a) Connect the Techstream to the DLC3.
(b) Turn the ignition switch to ON.
(c) Turn the Techstream on.
(d) Enter the following menus: Body / SRS Airbag / Trouble Codes.
(e) Clear the DTCs.
 Diagnosis System
DIAGNOSIS SYSTEM
1. SYMPTOM SIMULATION
HINT:
The most difficult case in troubleshooting is when no problem symptoms occur.
In such a case, a thorough problem analysis must be carried out. A simul ...
 Check Mode Procedure
CHECK MODE PROCEDURE
NOTICE:
Enter "Signal Check" from the "DTC Check" screen displayed on the Techstream
to clear the output DTCs (both present and past).
HINT:
DTCs ...
Other materials about Toyota 4Runner:
How To Proceed With Troubleshooting
CAUTION / NOTICE / HINT
HINT:
Use these procedures to troubleshoot the airbag system.
*: Use the Techstream.
PROCEDURE
1.
VEHICLE BROUGHT TO WORKSHOP
NEXT
...
Pressure Sensor or Switch (C1254)
DESCRIPTION
The accumulator pressure sensor is connected to the skid control ECU in the master
cylinder solenoid.
DTC Code
DTC Detection Condition
Trouble Area
C1254
There is an accumulator pre ...
0.0082