Toyota 4Runner: Removal
REMOVAL
CAUTION / NOTICE / HINT
HINT:
- Use the same procedure for the RH and LH sides.
- The procedure listed below is for the LH side.
- When removing the window frame moulding, black out tape and outside
stripe, heat the vehicle body, window frame moulding, black out tape and
outside stripe using a heat light.
Standard:
Item
Temperature
Vehicle Body
40 to 60°C (104 to 140°F)
Window Frame Moulding
20 to 30°C (68 to 86°F)
Black Out Tape
20 to 30°C (68 to 86°F)
Outside Stripe
20 to 30°C (68 to 86°F)
NOTICE:
Do not heat the vehicle body, window frame moulding, black out tape or outside stripe excessively.
PROCEDURE
1. DISCONNECT CABLE FROM NEGATIVE BATTERY TERMINAL
CAUTION:
Wait at least 90 seconds after disconnecting the cable from the negative (-) battery terminal to disable the SRS system.
NOTICE:
When disconnecting the cable, some systems need to be initialized after the cable
is reconnected (See page .gif) ).
).
2. REMOVE FRONT DOOR LOWER FRAME BRACKET GARNISH LH
3. REMOVE NO. 2 DOOR INSIDE HANDLE BEZEL LH
4. REMOVE FRONT DOOR TRIM BOARD SUB-ASSEMBLY LH
5. REMOVE FRONT DOOR INNER GLASS WEATHERSTRIP LH
6. REMOVE FRONT DOOR SERVICE HOLE COVER LH
7. REMOVE OUTER REAR VIEW MIRROR ASSEMBLY LH
8. REMOVE FRONT DOOR GLASS SUB-ASSEMBLY LH
9. REMOVE FRONT DOOR GLASS RUN LH
10. REMOVE FRONT DOOR BELT MOULDING LH
11. REMOVE FRONT DOOR WEATHERSTRIP LH
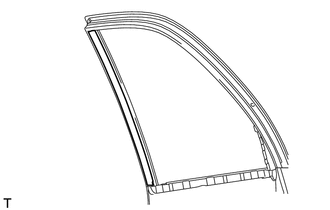
12. REMOVE FRONT DOOR REAR WINDOW FRAME MOULDING LH
13. REMOVE NO. 1 BLACK OUT TAPE LH
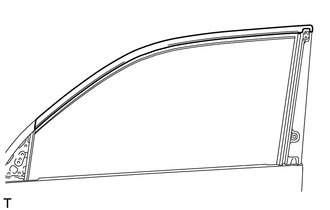
(a) Pull back an edge of the black out tape and pull it parallel to the vehicle body to remove it.
14. REMOVE FRONT DOOR OUTSIDE STRIPE LH
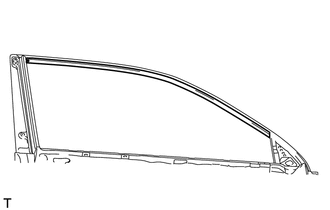
(a) Pull back an edge of the front door outside stripe and pull it parallel to the vehicle body to remove it.
15. REMOVE FRONT DOOR LOWER OUTSIDE STRIPE LH
(a) Pull back an edge of the lower front door outside stripe and pull it parallel to the vehicle body to remove it.
 Components
COMPONENTS
ILLUSTRATION
ILLUSTRATION
ILLUSTRATION
ILLUSTRATION
...
 Installation
INSTALLATION
CAUTION / NOTICE / HINT
HINT:
Use the same procedure for the RH and LH sides.
The procedure listed below is for the LH side.
When installing the window frame moulding, ...
Other materials about Toyota 4Runner:
Adjustment
ADJUSTMENT
PROCEDURE
1. STEERING OFF CENTER ADJUSTMENT PROCEDURE
HINT:
This is the adjustment procedure for when the steering is off center.
(a) Check if the steering wheel is off center.
(1) Apply masking tape to the top center of the steerin ...
Installation
INSTALLATION
CAUTION / NOTICE / HINT
HINT:
A bolt without a torque specification is shown in the standard bolt chart (See
page ).
PROCEDURE
1. INSTALL MULTIPLEX NETWORK BODY ECU
NOTICE:
Make sure that no foreign objects contact the connecting ...
0.0086