Toyota 4Runner: Transfer Oil
On-vehicle Inspection
ON-VEHICLE INSPECTION
PROCEDURE
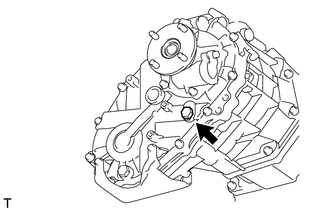
1. CHECK TRANSFER OIL
|
(a) Remove the filler plug and gasket. |
|
|
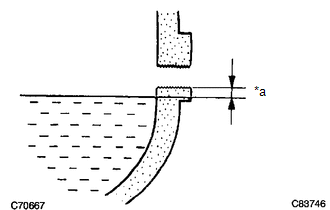
(b) Check that the oil level is between 0 to 5.0 mm (0 to 0.196 in.) from the bottom lip of the filler plug hole. Text in Illustration
If the result is not as specified, add transfer oil. NOTICE: Too much or too little oil will lead to transfer problems. |
|
(c) When the oil level is too low, check for oil leaks.
(d) Install a new gasket to the filler plug and then tighten the plug.
Torque:
37 N·m {377 kgf·cm, 27 ft·lbf}
2. ADD TRANSFER OIL
|
(a) Remove the filler plug and gasket. |
|
(b) Add oil so that the oil level is between 0 to 5.0 mm (0 to 0.196 in.) from the bottom lip of the filler plug hole.
NOTICE:
- Add oil slowly.
- Add oil a little at a time, waiting several minutes between each addition of oil.
HINT:
-
Viscosity:
SAE 75W
Capacity:
1.0 liters (1.1 US qts, 0.9 lmp.qts)
(c) Wait approximately 5 minutes and check that the oil level has not changed.
(d) Install a new gasket to the filler plug and then tighten the plug.
Torque:
37 N·m {377 kgf·cm, 27 ft·lbf}
Replacement
REPLACEMENT
PROCEDURE
1. DRAIN TRANSFER OIL
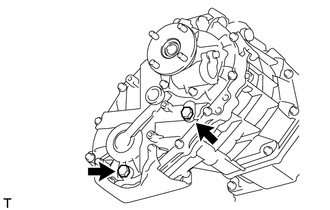
(a) Remove the filler plug and gasket.
(b) Remove the drain plug and gasket, and drain the transfer oil.
2. ADD TRANSFER OIL
.gif)
 Transfer Indicator Switch
Components
COMPONENTS
ILLUSTRATION
Inspection
INSPECTION
PROCEDURE
1. INSPECT TRANSFER INDICATOR SWITCH (4WD POSITION)
(a) Measure the resistance according to the value(s) in the table ...
 Transfer System
...
Other materials about Toyota 4Runner:
Removal
REMOVAL
CAUTION / NOTICE / HINT
HINT:
Use the same procedure for the RH and LH sides.
The procedure listed below is for the LH side.
When removing the window frame moulding, black out tape and outside
stripe, heat the vehicle body, windo ...
Front Airbag Sensor LH Malfunction (B1615/14)
DESCRIPTION
The front airbag sensor LH consists of the diagnostic circuit and frontal deceleration
sensor, etc.
If the center airbag sensor receives signals from the frontal deceleration sensor,
it determines whether the SRS should be activated.
DTC B16 ...
0.0124