Toyota 4Runner: Dcm Activation
DCM ACTIVATION
1. DCM ACTIVATION
This function should be used to activate the DCM (Telematics Transceiver) after a new DCM (Telematics Transceiver) has been installed. During the DCM (Telematics Transceiver) activation process, the Techstream automatically provides the telematics service provider with the new DCM (Telematics Transceiver) information and clears the old DCM (Telematics Transceiver) information associated with the vehicle. The DCM (Telematics Transceiver) that was replaced should be returned to the parts department.
(a) Connect the Techstream to the DLC3.
(b) Turn the ignition switch to ON.
(c) Press the SOS button once to confirm the service part is not initialized ("Safety Connect is not initialized." voice prompt should be heard).
(d) Choose "Telematics" from the System Selection Menu, and then click "Utility".
(e) Click "DCM Service" on the Utility Selection Menu.
(f) Choose "Activate DCM" and then click "Next" on the DCM Service Utility.
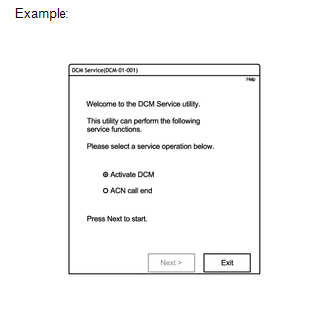
(g) Follow the instructions on the Techstream.
HINT:
- If PRL is not the latest version, the utility will report that a PRL update must be performed before DCM Activation can be completed.
- If a fault occurs during DCM Activation, a specific fault message will be displayed with procedure guidelines.
- The manual (SOS) switch green indicator will turn on if activation is
successful.
Fault Code
Reason
20
System timeout
61
DCM (Telematics Transceiver) has been identified as previously used part
62
VIN is not recognized by telematics provider
63
DCM (Telematics Transceiver) is already associated with another vehicle. Use another authorized service part.
64
DCM (Telematics Transceiver) is not recognized
66
DCM (Telematics Transceiver) is not service part. Use only authorized service part.
67
Unable to activate at this time
HINT:
If one of these fault codes is present, follow the procedure indicated in the follow list.
- Fault 20: Try DCM Activation again.
- Fault 61: Replace the DCM (Telematics Transceiver) with a new service part and perform DCM Activation.
- Fault 62*: Verify that the VIN is correct in the vehicle ECU. Run Vehicle Inquiry and verify the VIN. Confirm the DCM service part by pressing the SOS button once and listening for "Safety Connect is not initialized." voice prompt, and then try activation again.
- Fault 63: Replace the DCM (Telematics Transceiver) with a new service part and perform DCM Activation.
- Fault 64*: Verify that the DCM (Telematics Transceiver) is a new service part.
- Fault 66*: Replace the DCM (Telematics Transceiver) with a new service part and perform DCM Activation.
- Fault 67: Try DCM Activation again. If the fault occurs again, wait and try again later.
*: As the fault could also be caused by a problem in communicating with the call center, before replacing the DCM, check with the call center to determine it there is a database or communication problem.
(h) Push the manual (SOS) switch to call an operator and confirm that the DCM (Telematics Transceiver) is activated.
 Dcm Operation History
DCM OPERATION HISTORY
1. DCM OPERATION HISTORY
This function shows the telematics network status when the DCM (Telematics Transceiver)
was operated. Use this function when no DTC is stored but the ...
 Health Check
HEALTH CHECK
1. HEALTH CHECK
Health Check provides an overall view of the vehicle status including telematics.
Health Check will provide the DCM (Telematics Transceiver) software version, PRL
ve ...
Other materials about Toyota 4Runner:
Door Courtesy Switch Circuit
DESCRIPTION
The main body ECU (multiplex network body ECU) receives a door open/closed signal
from each door courtesy light switch.
WIRING DIAGRAM
PROCEDURE
1.
READ VALUE USING TECHSTREAM (DOOR COURTESY LIGHT SWITCH)
(a ...
Reverse Signal Circuit
DESCRIPTION
The radio and display receiver assembly receives a reverse signal from the park/neutral
position switch assembly.
WIRING DIAGRAM
PROCEDURE
1.
CHECK HARNESS AND CONNECTOR (REVERSE SIGNAL)
(a) Disconnect the G ...

0.0122