
Toyota 4Runner: Hall Effect Sensor LH (43,44)
DESCRIPTION
When the automatic running board is operating and the current in the side auto step motor is within standard parameters, the side auto step controller ECU assembly halts the operation of the automatic running board if it does not receive a side auto step motor hall sensor signal.
|
DTC No. |
Detection Condition |
Trouble Area |
|---|---|---|
|
43 |
The side auto step motor LH current is normal and there is no side auto step motor assembly LH hall sensor signal. |
|
|
44 |
The side auto step motor RH current is normal and there is no side auto step motor assembly RH hall sensor signal. |
WIRING DIAGRAM
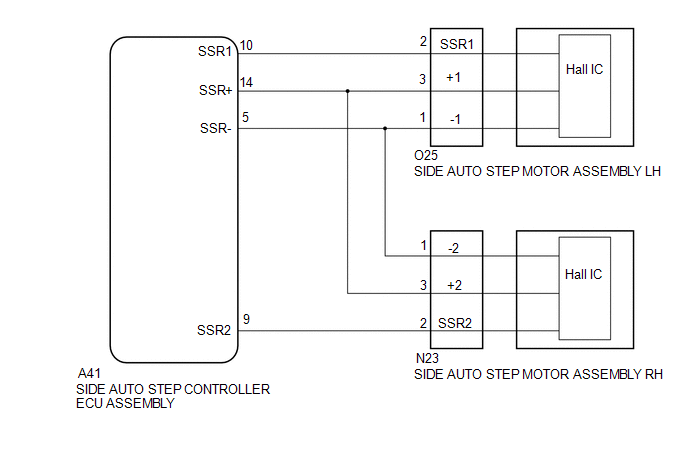
PROCEDURE
|
1. |
CHECK HARNESS AND CONNECTOR (SIDE AUTO STEP MOTOR - SIDE AUTO STEP CONTROLLER ECU) |
(a) Disconnect the O25*1 or N23*2 side auto step motor assembly connector.
- *1: for LH
- *2: for RH
(b) Disconnect the A41 side auto step controller ECU assembly connector.
(c) Measure the resistance according to the value(s) in the table below.
Standard Resistance:
for LH
|
Tester Connection |
Condition |
Specified Condition |
|---|---|---|
|
O25-1 (-1) - A41-5 (SSR-) |
Always |
Below 1 Ω |
|
O25-2 (SSR1) - A41-10 (SSR1) |
Always |
Below 1 Ω |
|
O25-3 (+1) - A41-14 (SSR+) |
Always |
Below 1 Ω |
|
A41-10 (SSR1) - Body ground |
Always |
10 kΩ or higher |
for RH
|
Tester Connection |
Condition |
Specified Condition |
|---|---|---|
|
N23-1 (-2) - A41-5 (SSR-) |
Always |
Below 1 Ω |
|
N23-2 (SSR2) - A41-9 (SSR2) |
Always |
Below 1 Ω |
|
N23-3 (+2) - A41-14 (SSR+) |
Always |
Below 1 Ω |
|
A41-9 (SSR2) - Body ground |
Always |
10 kΩ or higher |
| OK | .gif) |
REPLACE SIDE AUTO STEP MOTOR ASSEMBLY |
| NG | |
REPAIR OR REPLACE HARNESS OR CONNECTOR |
 ECU Circuit (61)
DESCRIPTION
When the internal circuit of the side auto step controller ECU assembly malfunctions,
the side auto step controller ECU assembly halts the operation of the system.
DTC No.
...
 Side Auto Step LH Stowing Timeout (51-56)
DESCRIPTION
When fully deploying or stowing the automatic running board takes more than 4
seconds, or when the side auto step motor hall sensor pulse signal exceeds the maximum
pulse count, the s ...
Other materials about Toyota 4Runner:
Open in ABS Solenoid Relay Circuit (C0278,C0279)
DESCRIPTION
The solenoid relay is built into the master cylinder solenoid.
This relay supplies power to each solenoid. If the initial check is OK, after
the ignition switch is turned to ON, the relay turns on.
DTC Code
DTC Detection ...
Reassembly
REASSEMBLY
CAUTION / NOTICE / HINT
PROCEDURE
1. INSTALL PLUG
(a) Using the SST and a hammer, install a new plug.
SST: 09950-60010
09951-00450
SST: 09950-70010
09951-07100
2. INSTALL FRO ...

0.0248