Toyota 4Runner: Inspection
INSPECTION
PROCEDURE
1. INSPECT REAR NO. 1 SEAT OUTER BELT ASSEMBLY RH
NOTICE:
Do not disassemble the retractor.
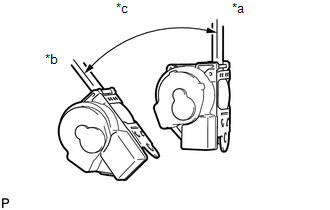
(a) When the inclination of the retractor is 15° or less, check that the belt can be pulled from the retractor. When the inclination of the retractor is more than 45°, check that the belt locks.
If the operation is not as specified, replace the belt.
(b) Check the fastening function of the child restraint system.
NOTICE:
The check should be performed with the outer belt installed.
(1) When the belt is pulled out fully, check that the belt automatically starts to retract.
(2) After the belt is fully retracted, check that the belt can be pulled out and retracted again. If the operation is not as specified, replace the belt assembly.
Text in Illustration|
*a |
Unlock |
|
*b |
Lock |
|
*c |
45° |
 Removal
REMOVAL
CAUTION / NOTICE / HINT
CAUTION:
Wear protective gloves. Sharp areas on the parts may injure your hands.
PROCEDURE
1. REMOVE REAR SEAT ASSEMBLY RH
(a) Remove the rear No. 1 seat assembly ...
 Installation
INSTALLATION
CAUTION / NOTICE / HINT
CAUTION:
Wear protective gloves. Sharp areas on the parts may injure your hands.
PROCEDURE
1. INSTALL REAR NO. 1 SEAT OUTER BELT ASSEMBLY RH
NOTICE:
When ...
Other materials about Toyota 4Runner:
Types of child restraints
Child restraint systems are classified into the following 3 types according
to the age and size of the child:
Rear facing — Infant seat/convertible seat
Forward facing — Convertible seat
Booster seat
Selecting an appropriate child restraint sys ...
Transmission Fluid Temperature Sensor "A" Performance (P0711)
DESCRIPTION
The ATF (Automatic Transmission Fluid) temperature sensor converts the ATF temperature
into a resistance value which is input into the ECM.
The ECM applies a voltage to the temperature sensor through ECM terminal THO1.
The sensor resistance ch ...

0.0068