
Toyota 4Runner: Removal
REMOVAL
CAUTION / NOTICE / HINT
CAUTION:
Wear protective gloves. Sharp areas on the parts may injure your hands.
PROCEDURE
1. REMOVE REAR SEAT ASSEMBLY RH
(a) Remove the rear No. 1 seat assembly RH (See page
.gif) ).
).
2. REMOVE NO. 1 SEATBACK BOARD SUB-ASSEMBLY (for Plastic Seatback Board)
3. REMOVE NO. 1 SEATBACK BOARD SUB-ASSEMBLY (for Seatback Board with Carpet)
4. REMOVE REAR SEAT INNER RECLINING COVER RH
5. REMOVE REAR CENTER SEAT INNER BELT ASSEMBLY
6. REMOVE CENTER SEATBACK COVER SUB-ASSEMBLY
7. REMOVE CENTER SEATBACK ASSEMBLY
8. REMOVE CENTER NO. 2 SEATBACK COVER
9. REMOVE REAR SEATBACK LOCK COVER RH
10. REMOVE REAR SEATBACK LOCK ASSEMBLY RH
11. REMOVE REAR SEATBACK STOP BUTTON GROMMET
12. REMOVE REAR NO. 1 SEAT HEADREST SUPPORT ASSEMBLY
13. REMOVE SEAT BELT ANCHOR COVER CAP
14. REMOVE REAR SEAT SHOULDER BELT COVER
15. REMOVE REAR SEATBACK LOCK STRIKER PROTECTOR
16. REMOVE REAR SEAT LOCK STRIKER
17. REMOVE SEATBACK COVER WITH PAD
18. REMOVE REAR SEATBACK EDGE PROTECTOR
19. REMOVE REAR SEAT SHOULDER BELT GUIDE
20. REMOVE REAR NO. 1 SEAT OUTER BELT ASSEMBLY RH
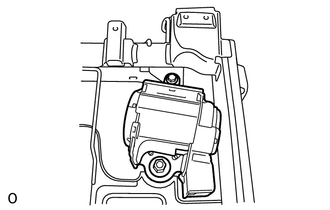
(a) Remove the nut and bolt, and then detach the 2 claws and remove the seat belt.
 Components
COMPONENTS
ILLUSTRATION
ILLUSTRATION
ILLUSTRATION
...
 Inspection
INSPECTION
PROCEDURE
1. INSPECT REAR NO. 1 SEAT OUTER BELT ASSEMBLY RH
NOTICE:
Do not disassemble the retractor.
(a) When the inclination of the retractor is 15° or less, check that the belt
...
Other materials about Toyota 4Runner:
Reassembly
REASSEMBLY
CAUTION / NOTICE / HINT
HINT:
Use the same procedure for the RH and LH sides.
The procedure listed below is for the LH side.
PROCEDURE
1. TEMPORARILY INSTALL FRONT DISC BRAKE BLEEDER PLUG
(a) Temporarily install the front dis ...
Event data recorder
This vehicle is equipped with an event data recorder (EDR). The main purpose
of an EDR is to record, in certain crash or near crash-like situations, such as
an air bag deployment or hitting a road obstacle, data that will assist in
understanding how a ve ...

0.0078