
Toyota 4Runner: Inspection
INSPECTION
PROCEDURE
1. INSPECT SPIRAL CABLE SUB-ASSEMBLY
(a) If there are any defects as mentioned below, replace the spiral cable with a new one:
Scratches, cracks, dents or chips in the connector or spiral cable.
(b) Check the spiral cable.
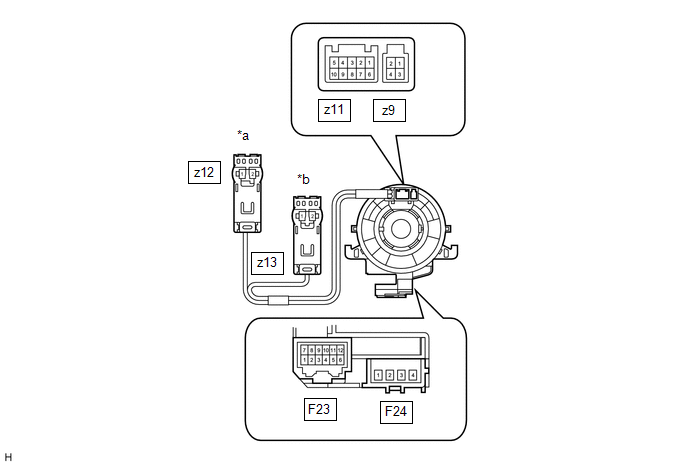 Text in Illustration
|
*a |
Orange |
|
*b |
Black |
(1) Set the spiral cable to the center position (See page
.gif) ).
).
(2) After setting the spiral cable to the center position, rotate the spiral cable 2.5 times clockwise and measure the resistance according to the value(s) in the table below. Then rotate the spiral cable 5 times counterclockwise and measure the resistance according to the value(s) in the table below.
Standard Resistance:
|
Tester Connection |
Condition |
Specified Condition |
|---|---|---|
|
F24-1 - z12-2 |
Always |
Below 1 Ω |
|
F24-2 - z12-1 |
Always |
Below 1 Ω |
|
F24-3 - z13-2 |
Always |
Below 1 Ω |
|
F24-4 - z13-1 |
Always |
Below 1 Ω |
|
F23-6 - z11-10 |
Always |
Below 1 Ω |
|
F23-5 - z11-9 |
Always |
Below 1 Ω |
|
F23-4 - z11-8 |
Always |
Below 1 Ω |
|
F23-3 - z11-7 |
Always |
Below 1 Ω |
|
F23-2 - z11-6 |
Always |
Below 1 Ω |
|
F23-1 - z9-3 |
Always |
Below 1 Ω |
|
F23-12 - z11-5 |
Always |
Below 1 Ω |
|
F23-11 - z11-4 |
Always |
Below 1 Ω |
|
F23-10 - z11-3 |
Always |
Below 1 Ω |
|
F23-9 - z11-2 |
Always |
Below 1 Ω |
|
F23-8 - z11-1 |
Always |
Below 1 Ω |
|
F23-7 - z9-1 |
Always |
Below 1 Ω |
(3) After setting the spiral cable to the center position, rotate the spiral cable 2.5 times clockwise. Then, while rotating the spiral cable 5 times counterclockwise, measure the resistance according to the value(s) in the table below.
Standard Resistance:
|
Tester Connection |
Condition |
Specified Condition |
|---|---|---|
|
F24-1 - z12-2 |
Always |
Below 1 Ω |
|
F24-2 - z12-1 |
Always |
Below 1 Ω |
|
F24-3 - z13-2 |
Always |
Below 1 Ω |
|
F24-4 - z13-1 |
Always |
Below 1 Ω |
|
F23-6 - z11-10 |
Always |
Below 1 Ω |
|
F23-5 - z11-9 |
Always |
Below 1 Ω |
|
F23-4 - z11-8 |
Always |
Below 1 Ω |
|
F23-3 - z11-7 |
Always |
Below 1 Ω |
|
F23-2 - z11-6 |
Always |
Below 1 Ω |
|
F23-1 - z9-3 |
Always |
Below 1 Ω |
|
F23-12 - z11-5 |
Always |
Below 1 Ω |
|
F23-11 - z11-4 |
Always |
Below 1 Ω |
|
F23-10 - z11-3 |
Always |
Below 1 Ω |
|
F23-9 - z11-2 |
Always |
Below 1 Ω |
|
F23-8 - z11-1 |
Always |
Below 1 Ω |
|
F23-7 - z9-1 |
Always |
Below 1 Ω |
NOTICE:
As the spiral cable may break, do not rotate the spiral cable more than the specified amount.
 Removal
REMOVAL
CAUTION / NOTICE / HINT
PROCEDURE
1. REMOVE STEERING WHEEL ASSEMBLY
(a) Remove the steering wheel assembly (See page
).
2. REMOVE LOWER STEERING COLUMN COVER
3. REMOVE UPPER STEERIN ...
 Installation
INSTALLATION
PROCEDURE
1. INSTALL SPIRAL CABLE SUB-ASSEMBLY
(a) Attach the 3 claws to install the spiral cable.
CAUTION:
When replacing the spiral cable with a new one, remove the lock pin before ...
Other materials about Toyota 4Runner:
Installation
INSTALLATION
CAUTION / NOTICE / HINT
CAUTION:
Wear protective gloves. Sharp areas on the parts may injure your hands.
HINT:
A bolt without a torque specification is shown in the standard bolt chart (See
page ).
PROCEDURE
1. INSTALL REAR SEAT CUSHION ...
Touch Panel Switch does not Function
PROCEDURE
1.
CHECK MULTI-DISPLAY
(a) Check if there is any foreign matter caught between the display and exterior
frame of the multi-display.
OK:
No foreign matter is caught between the display and exterior frame of the m ...

0.0267