Toyota 4Runner: Installation
INSTALLATION
CAUTION / NOTICE / HINT
HINT:
- Use the same procedure for the RH and LH sides.
- The procedure listed below is for the LH side.
- When installing the clip, heat the vehicle body and clip using a heat
light.
Standard:
Item
Temperature
Vehicle Body
40 to 60°C (104 to 140°F)
Clip
20 to 30°C (68 to 86°F)
NOTICE:
Do not heat the vehicle body or clip excessively.
PROCEDURE
1. INSTALL ROOF DRIP SIDE FINISH MOULDING CLIP
NOTICE:
- If reusing the clips, do not remove the double-sided tape remaining on the clips and where the clips will be installed on the body.
- If installing new clips, remove the double-sided tape remaining where the clips will be installed on the body and clean the body with a non-residue solvent.
|
(a) Apply a 2 to 3 mm (0.0787 to 0.118 in.) bead of adhesive (3M DP-105 or equivalent) to new roof drip side finish moulding clips. Text in Illustration
HINT: Adhesive strength (tensile strength): 13.7 MPa (140.0 kgf/cm2) or more (when the temperature is 23°C (73°F)) |
|
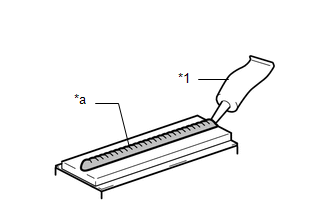
(b) Apply primer to the body where the roof drip side finish moulding clip will be installed.
NOTICE:
Do not let the primer dry.
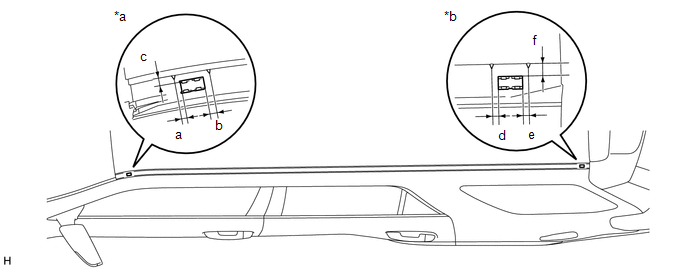
(c) While using the position shown in the illustration as a reference, place the No. 1 roof drip side finish moulding clip onto the roof panel. Then position and install the clip after lightly pressing it so that the adhesive adheres to the primer.
 Text in Illustration
|
*a |
for Front Side |
*b |
for Rear Side |
Reference Value:
|
Area |
Specified Condition |
Area |
Specified Condition |
|---|---|---|---|
|
a |
5.1 to 5.6 mm (0.201 to 0.220 in.) |
b |
5.8 mm (0.228 in.) |
|
c |
6.05 to 6.1 mm (0.238 to 0.240 in.) |
d |
5 mm (0.197 in.) |
|
e |
5 to 5.5 mm (0.197 to 0.217 in.) |
f |
10.5 to 11 mm (0.413 to 0.433 in.) |
(d) Install the rear roof drip side finish moulding when 40 minutes or more have elapsed after pressing and installing the roof drip side finish moulding clip.
HINT:
- Initial hardening time: 40 minutes
- Complete hardening time: 48 hours
2. INSTALL ROOF DRIP SIDE FINISH MOULDING LH
(a) Attach the clip to install the roof drip side finish moulding.
3. INSTALL CENTER ROOF DRIP SIDE FINISH MOULDING LH
(a) Install the center roof drip side finish moulding.
4. INSTALL ROOF DRIP SIDE FINISH MOULDING LH
(a) Attach the clip to install the roof drip side finish moulding.
5. INSTALL ROOF RACK BRACKET (w/o Roof Rack)
HINT:
Use the same procedure to install the roof rack bracket on the other side.
(a) Install the roof rack bracket with the 2 bolts.
Torque:
10 N·m {102 kgf·cm, 7 ft·lbf}
6. INSTALL FRONT ROOF DRIP SIDE MOULDING COVER LH (w/o Roof Rack)
HINT:
Use the same procedure to install the roof drop side finish moulding cover on the other side.
(a) Attach the 2 clips to install the front roof drip side moulding cover.
7. INSTALL ROOF RAIL ASSEMBLY LH (w/ Roof Rack)
(a) Install the roof rail (See page .gif) ).
).
 Removal
REMOVAL
CAUTION / NOTICE / HINT
HINT:
Use the same procedure for the RH and LH sides.
The procedure listed below is for the LH side.
PROCEDURE
1. REMOVE ROOF RAIL ASSEMBLY LH (w ...
 Roof Rack
Components
COMPONENTS
ILLUSTRATION
ILLUSTRATION
Removal
REMOVAL
CAUTION / NOTICE / HINT
HINT:
Use the same procedure for the RH and LH sides.
The procedure listed below is ...
Other materials about Toyota 4Runner:
Side Turn Signal Light Assembly
Components
COMPONENTS
ILLUSTRATION
Removal
REMOVAL
CAUTION / NOTICE / HINT
HINT:
Use the same procedure for both the RH and LH sides.
The procedure listed below is for the LH side.
PROCEDURE
1. REMOVE OUTER MIRROR LH
2. REM ...
Shifting between H2 and H4
Shifting from H2 to H4
Type A
Reduce vehicle speed to less
than 50 mph (80 km/h).
Shift the front-wheel drive
control lever to H4.
Type B
Reduce vehicle speed to less
than 62 mph (100 km/h).
Push the “UNLOCK” button and
turn the front-whee ...

0.0303