Toyota 4Runner: Installation
INSTALLATION
PROCEDURE
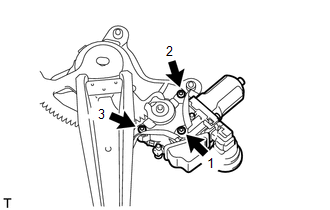
1. INSTALL POWER WINDOW REGULATOR MOTOR ASSEMBLY LH
NOTICE:
The regulator arm must be below the intermediate position when installing the rear power window regulator motor assembly.
|
(a) Using a T25 "TORX" socket wrench, install the power window regulator motor with the 3 screws. HINT:
Torque: 5.4 N·m {55 kgf·cm, 48 in·lbf} |
|
2. INSTALL REAR DOOR WINDOW REGULATOR SUB-ASSEMBLY LH
.gif)
3. INSTALL REAR DOOR GLASS SUB-ASSEMBLY LH
4. INSTALL REAR DOOR QUARTER WINDOW GLASS LH
5. INSTALL REAR DOOR WINDOW REAR LOWER FRAME SUB-ASSEMBLY LH
6. INSTALL REAR DOOR GLASS RUN LH
7. INSTALL REAR DOOR SERVICE HOLE COVER LH
8. INSTALL REAR SPEAKER ASSEMBLY
9. INSTALL REAR DOOR INNER GLASS WEATHERSTRIP LH
10. INSTALL REAR DOOR TRIM BOARD SUB-ASSEMBLY LH
11. INSTALL NO. 2 DOOR INSIDE HANDLE BEZEL LH
12. CONNECT CABLE TO NEGATIVE BATTERY TERMINAL
NOTICE:
When disconnecting the cable, some systems need to be initialized after the cable
is reconnected (See page ).
13. INITIALIZE POWER WINDOW CONTROL SYSTEM
(a) Initialize the power window control system (See page
).
 Inspection
INSPECTION
PROCEDURE
1. INSPECT REAR POWER WINDOW REGULATOR MOTOR ASSEMBLY LH
(a) Check that the motor gear rotates smoothly as follows.
NOTICE:
Do not apply positive (+) battery v ...

Other materials about Toyota 4Runner:
Installation
INSTALLATION
PROCEDURE
1. INSTALL POWER WINDOW REGULATOR MOTOR ASSEMBLY LH
NOTICE:
The regulator arm must be below the intermediate position when installing the
rear power window regulator motor assembly.
(a) Using a T25 "TORX" sock ...
Stereo Component Amplifier Malfunction (B15A3)
DESCRIPTION
This DTC is stored when a malfunction occurs in the stereo component amplifier
assembly.
DTC No.
DTC Detection Condition
Trouble Area
B15A3
When one of the conditions below is met:
...

0.0064