Toyota 4Runner: Installation
INSTALLATION
CAUTION / NOTICE / HINT
CAUTION:
Wear protective gloves. Sharp areas on the parts may injure your hands.
HINT:
- Use the same procedure for the RH and LH sides.
- The procedure listed below is for the LH side.
PROCEDURE
1. INSTALL FRONT SEAT CUSHION HEATER ASSEMBLY LH
|
(a) Set the front seat cushion heater assembly LH in place with the name stamp side facing the seat cushion cover. Text in Illustration
|
|

(b) Install the front seat cushion heater assembly LH with new 22 tack pins.
|
(c) Connect the wire harness to the separate type front seat cushion cover. |
|

2. INSTALL SEPARATE TYPE FRONT SEAT CUSHION COVER
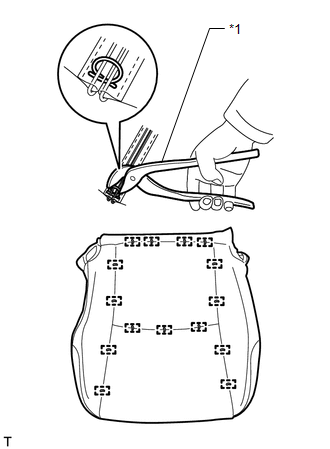
(a) Using hog ring pliers, install the separate type front seat cushion cover to the separate type front seat cushion pad with 15 new hog rings.
Text in Illustration|
*1 |
Hog Ring Pliers |
NOTICE:
- Be careful not to damage the separate type front seatback cover.
- Be sure to securely install the hog rings as shown in the illustration while preventing wrinkles from forming on the separate type front seatback cover.
3. INSTALL SEAT CUSHION COVER WITH PAD
(a) Attach the 7 hooks to install the seat cushion cover with pad.
(b) Connect the seat heater connector and attach the 3 wire harness clamps.
(c) Attach the 2 hooks.
(d) Attach the fastening tape to connect the airbag wire harness.
(e) Connect the seat heater connector and attach the wire harness clamp.
(f) w/o Climate Control Seat System:
Install the rubber band to the separate type front seat cushion spring assembly.
4. INSTALL FRONT SEAT INNER BELT ASSEMBLY LH
.gif)
5. INSTALL FRONT SEAT INNER CUSHION SHIELD LH (for Driver Side)
6. INSTALL FRONT SEAT INNER CUSHION SHIELD RH (for Front Passenger Side)
7. INSTALL FRONT SEAT CUSHION SHIELD LH
8. INSTALL FRONT SEATBACK BOARD CLIP (w/ Climate Control Seat System)
Click here
9. INSTALL FRONT SEATBACK BOARD SUB-ASSEMBLY LH (w/ Climate Control Seat System)
10. INSTALL FRONT SEAT ASSEMBLY
(See page )
 Inspection
INSPECTION
PROCEDURE
1. INSPECT FRONT SEAT CUSHION HEATER ASSEMBLY LH
(a) Check the seat cushion heater.
(1) Measure the resistance according to the value(s) in the table below.
Standard Resist ...

Other materials about Toyota 4Runner:
Horn Circuit
DESCRIPTION
When the theft deterrent system is in the alarm sounding state, the main body
ECU outputs a signal repeatedly at 0.4 second intervals, causing the horn(s) to
sound.
WIRING DIAGRAM
PROCEDURE
1.
CHECK HORN OPERATION
...
Route cannot be Calculated
PROCEDURE
1.
SET DESTINATION
(a) Set another destination and check if the system can calculate the route correctly.
OK:
Route can be correctly calculated.
OK
NORMAL OPERATION
NG
...

0.0287