Toyota 4Runner: Installation
INSTALLATION
CAUTION / NOTICE / HINT
HINT:
- Use the same procedure for the RH and LH sides.
- The procedure listed below is for the LH side.
- A bolt without a torque specification is shown in the standard bolt
chart (See page
.gif) ).
).
PROCEDURE
1. INSTALL REAR SEAT OUTER BELT ANCHOR PLATE SUB-ASSEMBLY LH
(a) Install the anchor plate with the bolt.
Torque:
42 N·m {428 kgf·cm, 31 ft·lbf}
NOTICE:
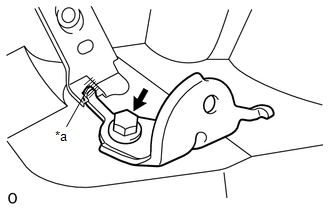
Do not allow the anchor part of the anchor plate sub-assembly to overlap the protruding parts of the vehicle body.
Text in Illustration|
*a |
Protruding Part |
2. INSTALL SEAT BELT ANCHOR PLATE ASSEMBLY (for RH Side)
(a) Install the anchor plate with the 2 bolts.
Torque:
42 N·m {428 kgf·cm, 31 ft·lbf}
3. INSTALL REAR NO. 2 SEAT OUTER BELT ASSEMBLY LH
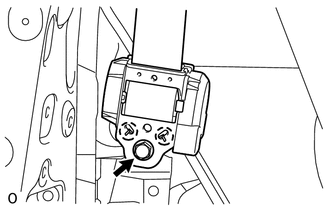
(a) Align the claws with the seat belt positioning holes and install the retractor of the seat belt with the bolt as shown in the illustration.
Torque:
42 N·m {428 kgf·cm, 31 ft·lbf}
(b) Install the rear No. 1 seat outer belt shoulder anchor with the bolt.
Torque:
42 N·m {428 kgf·cm, 31 ft·lbf}
4. INSTALL REAR WINDOW SIDE GARNISH ASSEMBLY LH
5. INSTALL REAR NO. 2 WINDOW SIDE GARNISH ASSEMBLY LH
6. INSTALL DECK TRIM SIDE PANEL ASSEMBLY LH
(a) Attach the 7 clips, 5 claws and 2 guides to install the deck trim side panel.
(b) Install the 3 bolts and 2 screws.
(c) Install the rear No. 1 seat outer belt floor anchor with the bolt.
Torque:
42 N·m {428 kgf·cm, 31 ft·lbf}
|
(d) for LH Side: Install the rear No. 2 seat outer belt floor anchor with the bolt. Torque: 42 N·m {428 kgf·cm, 31 ft·lbf} NOTICE: Do not allow the anchor part of the anchor plate sub-assembly to overlap the protruding parts of the vehicle body. Text in Illustration
|
|
.png)
|
(e) for RH Side: Install the rear No. 2 seat outer belt floor anchor with the bolt. Torque: 42 N·m {428 kgf·cm, 31 ft·lbf} NOTICE: Do not allow the anchor part of the anchor plate sub-assembly to overlap the protruding parts of the vehicle body. Text in Illustration
|
|
.png)
7. INSTALL FRONT DECK SIDE TRIM COVER LH
8. INSTALL NO. 1 LUGGAGE COMPARTMENT TRIM HOOK
9. INSTALL REAR NO. 1 SEAT OUTER LAP BELT ANCHOR COVER
10. INSTALL REAR DOOR OPENING TRIM WEATHERSTRIP LH
11. INSTALL REAR DOOR SCUFF PLATE LH
12. INSTALL QUARTER SCUFF PLATE LH
13. INSTALL REAR NO. 2 SEAT ASSEMBLY
(a) Install the rear No. 2 seat assembly (See page
).
 Inspection
INSPECTION
PROCEDURE
1. INSPECT REAR NO. 1 SEAT OUTER BELT ASSEMBLY
(a) Check the ELR.
(1) When the inclination of the retractor is 15° or less, check that
the belt can be pulled ...

Other materials about Toyota 4Runner:
Precaution
PRECAUTION
1. IGNITION SWITCH EXPRESSION
HINT:
The type of ignition switch used on this model differs according to the specifications
of the vehicle. The expressions listed in the table below are used in this section.
Expression
Ign ...
Weight limits
• The gross trailer weight must never exceed the TWR described in the table.
• The gross combination weight must never exceed the GCWR described in the
table.
• The gross vehicle weight must never exceed the GVWR indicated on the
Certification ...

0.0063