Toyota 4Runner: Removal
REMOVAL
CAUTION / NOTICE / HINT
CAUTION:
Wear protective gloves. Sharp areas on the parts may injure your hands.
PROCEDURE
1. REMOVE REAR SEAT ASSEMBLY LH
(a) Remove the rear seat assembly LH (See page
.gif) ).
).
2. REMOVE REAR SEAT UPPER RECLINING COVER LH
3. REMOVE RECLINING ADJUSTER RELEASE HANDLE LH
4. REMOVE CENTER SEAT HINGE COVER RH
5. REMOVE REAR SEAT CUSHION MOULDING LH
6. REMOVE REAR SEATBACK LOCK STRIKER COVER LH
7. REMOVE SEAT CUSHION COVER WITH PAD
8. REMOVE REAR NO. 1 SEAT INNER BELT ASSEMBLY LH
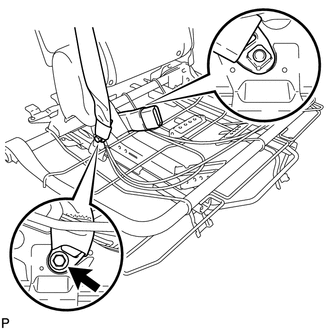
(a) Remove the bolt and inner belt and disconnect the 3 point type belt.
 Installation
INSTALLATION
CAUTION / NOTICE / HINT
CAUTION:
Wear protective gloves. Sharp areas on the parts may injure your hands.
HINT:
A bolt without a torque specification is shown in the standard bolt cha ...
 Rear No. 1 Seat Inner Belt Assembly(for 60/40 Split Slide Walk-in Seat Type
Rh Side)
Rear No. 1 Seat Inner Belt Assembly(for 60/40 Split Slide Walk-in Seat Type
Rh Side)
Components
COMPONENTS
ILLUSTRATION
Installation
INSTALLATION
CAUTION / NOTICE / HINT
CAUTION:
Wear protective gloves. Sharp areas on the parts may injure your hands.
HINT:
A bolt withou ...
Other materials about Toyota 4Runner:
Position Initialization Incomplete (B2343)
DESCRIPTION
This DTC is stored when the sliding roof drive gear sub-assembly (sliding roof
ECU) has not been initialized.
DTC Code
DTC Detection Condition
Trouble Area
B2343
The sliding roof driv ...
Front Passenger Side Power Window does not Operate with Front Passenger Side
Power Window Switch
DESCRIPTION
If the manual up/down function does not operate, there may be a malfunction
in the power window regulator switch, front power window regulator motor,
harness or connector.
WIRING DIAGRAM
CAUTION / NOTICE / HINT
NOTICE:
I ...

0.0151