Toyota 4Runner: Removal
REMOVAL
PROCEDURE
1. PRECAUTION
CAUTION:
Be sure to read Precaution thoroughly before servicing (See page
.gif) ).
).
NOTICE:
- When removing the front seat assembly RH, perform zero point calibration
and the sensitivity check (See page ).
- When replacing the occupant classification ECU, perform zero point calibration
and the sensitivity check (See page ).
2. REMOVE FRONT SEAT ASSEMBLY RH
HINT:
Refer to the procedures up to Remove Front Seat Assembly (See page
).
3. REMOVE OCCUPANT CLASSIFICATION ECU
|
(a) Disconnect the 2 connectors. |
|
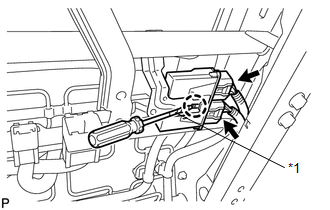
(b) Using a screwdriver, detach the claw and remove the occupant classification ECU.
HINT:
Tape the screwdriver tip before use.
Text in Illustration|
*1 |
Protective Tape |
 Installation
INSTALLATION
PROCEDURE
1. INSTALL OCCUPANT CLASSIFICATION ECU
(a) Attach the claw to install the occupant classification ECU.
NOTICE:
If the occupant classification ECU has been dr ...

Other materials about Toyota 4Runner:
Data List / Active Test
DATA LIST / ACTIVE TEST
1. DATA LIST
HINT:
Using the Techstream to read the Data List allows the values or states of switches,
sensors, actuators and other items to be read without removing any parts. This non-intrusive
inspection can be very useful bec ...
Engine Coolant Temperature Receiver Gauge Malfunction
DESCRIPTION
In this circuit, the meter CPU receives engine coolant temperature signals from
the ECM using the CAN communication system. The meter CPU displays the engine coolant
temperature, which is calculated based on the data received from the ECM.
WI ...

0.0069